Showing posts with label backtrack 5. Show all posts

Wednesday, May 29, 2013

Review: Penetration Testing with Backtrack (PWB) / Offensive Security Certified Professional (OSCP)

I recently took the PWB course, and finally passed the OSCP exam (and I'm very happy now :))))))), that's why I was quite for long time.

This was one of the best training and certification I have ever taken. I knew before I have started that it will be very hard and time consuming, but it was even more than I expected. First, I’m not really experienced on this subject, I made the EC-Council’s CEH course before this, but that was mainly theory and very little practice. Having a C|EH did help, as the whole stuff was familiar (in theory!), and didn’t need to start from scratch.

The training itself starts with receiving about 350 page long study material (lab guide) and about 7 hours video. These are covering all the basics you need for the later lab exercises. They start with how to setup services in BT (Backtrack), what is and how to do port scanning, various service enumeration, information gathering in general. Then it moves forward for writing buffer overflow exploits, it goes through all the steps in very detailed manner. After that they teach you how to work with public exploits, basics of Metasploit framework and there are two client side exploit case studies as well. The next big subject is transferring files between machines (there are some really tricky ones), tunneling, pivoting, and password attacks. Finally they cover basics of SQL injection and XSS attacks. There are a few other smaller topics, but they are not really part of the exercises later. There are quite a few exercises for each module to practice the techniques, which all have to be documented and sent along  the exam report at the end, but will talk about it later.

The big part is the remote lab. There is a big network with about 50 machines, and they try to simulate an existing organization with that. There are firewalls, proxy servers, machines are communicating with each other, so it’s pretty good. The big goal here is to attack all the machines and get root / admin access to all (or as many as you can/want to). I managed to own 46 machines. There are some very easy ones, and there are some which are really hard to get. My last and most difficult was “sufference” (you can have a guess, why the name is…), where I spent about 20-30 hours to get root on it; it was very-very tricky, and painful (oh, there is another box called “pain” – guess why :)). The training material teach you the basics, but you will have to go and learn a lot by your own, read about various services, OSes, application, and so on… because of the subject they just can’t cover everything, and this is really not the goal there, but to teach you to adapt and solve unknown problems, as you would face in real life. Will you spend hours in trying exploiting patched services, or other stuff, which won’t work? YES! Will you do it over and over again? YES! Will you hit your head to the desk, when you finally realize how to get in somewhere, and how stupid you were not seeing the forest because of the tree? Probably YES! :) All these part of the fun :) You can chat with the Offsec guys on IRC, but never expect them to give you a solution to any of the machines, if you go to them with some specific question, they may give you a hint, but that’s the maximum you can expect. Will you feel many times that you just can’t exploit a machine? YES! Will you get in later? Hopefully YES! I think their “Try Harder!” philosophy really works. Remember that all the machines are exploitable, and they are there to be exploited. All the boxes are different and almost all of them can be owned by different technique, so you can practice every type of attack, normal exploits, SQL injection, XSS attacks, client side exploits and so on. There are 4 networks in the lab separated by firewalls, proxy servers, as you would have in real life. You can practice various tunneling techniques there, and hopping from one machine to the next in the exploitation. I think if you are not a pentester, then you should get all of the machines in the lab, to get most out of the course. The lab time can be purchased for 30, 60 and 90 days, but if you feel it short, you can always extend it, as I did it (I went for 90 days + 30 days extension). I did the training after works and weekends, and I’m just lucky that my wife didn’t kill me for that :)

The exam. Obviously I can’t share details about it, but it’s a 24 hour long challenge, where you get access to another small network with a few machines, and similarly to the lab you need to get admin / root access on them. I really liked it, finally an exam, which not simple a lists of multi choice questions, but you really need to present your skills in practice, on a previously unknown environment (like on a Cisco CCIE). This is why it’s important to own all machines in the lab, to get prepared to the challenge, and face as many different systems as you can. Obviously you can use everything, as you could in a real world pentesting, but don’t expect the exam to be easy because of that. It’s hard. I started at 4PM (GMT+1), and progressed quite good, and at 1AM I already had enough points that I knew I will pass. So I went for a 6 hour sleep, and continued at 8AM, and quickly get my next machine. I decided to have a shower and breakfast then, and after that in another hour I completed everything. With that sad, it’s very important to take frequent breaks during the exam, as they can make huge difference; go and breathe some fresh air, your brain really needs oxygen :). I also prepared a list of commands I found very useful during the lab time, which became very handy during the exam.

The last part is to write the penetration test report about the exam, along with your recommendation how to fix the holes you have found. You have another 24 hours for that after the exam ends, so take notes, screenshots, etc… You need to make the same report for the lab network penetration testing and for the additional exercises you did during the training.

You get the results in 3 business days, but for me it was much quicker.

Overall I really enjoyed both the training and the exam, and I can’t say how much I learned during the last 4 months about this subject. It’s really worth its price, and much cheaper than any other similar training, you just need a lot of time, and even more time (I spent about 160-200 hours practicing in the lab after work and on weekends) – and most importantly a wife / girlfriend / family who will support you, and understand that you are not always available during this period :)

Links:

Friday, March 1, 2013

Computer Forensic Investigation w/ Backtrack

I took all my forensics related blog entries and created a single document from it, which can be downloaded from here:

Computer Forensic Investigation with Backtrack.pdf

I hope you will enjoy it.

Sunday, February 3, 2013

Backtrack Forensics: PTK

Menu: Forensics -> Forensic Suites
Directory: various
Official Website: http://ptk.dflabs.com/
License: BSD type (?)

The PTK is an alternative to the Autopsy forensic framework. It has two editions, one is free, and the other is not. BT includes the free version.

Once we click on starting it, we get a webpage to configure it. The root password for the MySQL database is "toor", if you haven't changed it.


After that the configuration is complete.


On the next window we can apply for our free activation code.


And that's how far I could get. I haven't received the activation code yet.

Saturday, February 2, 2013

Backtrack Forensics: Digital Forensic Framework (DFF)

Menu: Forensics -> Forensic Suites
Directory: various
Official Website: http://www.digital-forensic.org/
License: GNU GLP v2

DFF is a free and open source forensic tool, which can perform the most common forensic tasks, like image and file system analysis, file carving, memory analysis, etc...

For the example here I picked up image #11 from http://dftt.sourceforge.net/test11/index.html
I used the GUI version, and once it's started, we can select "File -> Open evidence"


Once the image is added we will see its details on the right. In the middle we can right click on the image name, and select "Open with", which will do an analysis / task with one of the modules.


Here I choose "Search -> carvergui" which will do file carving on the disk, based on file header signatures. I selected everything, and hit "Start".


Once, it's done, the results will appear in the left tree, and we can browse through.


I played around with a few tools, but I think the other individual tools, for specific tasks, are much better then this. It's not bad, but there are better stuff.

Backtrack Forensics: The Sleuth Kit & Autopsy

Menu: Forensics -> Forensic Suites
Directory: various
Official Website: http://www.sleuthkit.org/
License: GNU GLP v2, and various, check website for more details

The Sleuth Kit is a collection of tools, which are created for analyzing disk images and file system data, the functionality can be extended with plugins. Autopsy is the graphical front end to the Sleuth Kit. As the set contains quite much tools, I will go over only some of the basics, and then have a look on Autopsy.

mmls can give us partition information (size, where it starts, end) and cluster size info.
mmls /dev/sdc


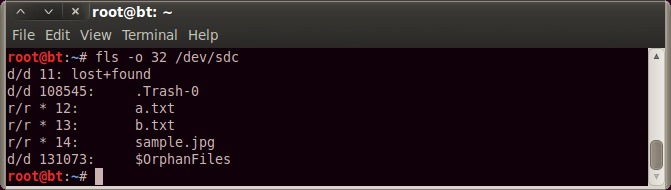
fls can print the file names found on a device.
fls -o 32 /dev/sdc - will list only the root directory, -o sets the offset to the file system, which we know from the mmls output
fls -pr -o 32 /dev/sdc - prints full path, and all files recursively
fls -lpr -o 32 /dev/sdc - prints long information (time, etc...)


icat can print the contents of a file, we need to supply the inode number for that, what we know from fls.
icat -o 32 /dev/sdc 108546

Autopsy:
I will use the following test image for the demo: http://dftt.sourceforge.net/test7/index.html

First we need to select setup autopsy from the menu, to go through a few settings. After that we can start it from "/pentest/forensics/autopsy" with:
./autopsy

First we will get the following error:

conf.pl did not return a true value at /pentest/forensics/autopsy/lib//Main.pm line 62.
Compilation failed in require at ./autopsy line 56.
BEGIN failed--compilation aborted at ./autopsy line 56.

This can be fixed by entering setting "$LOCKDIR = '/tmp'" in the conf.pl file. After that it will start, and we can navigate in the browser to:

http://localhost:9999/autopsy

Autopsy works with the following structure:
Cases -> Hosts -> Images
So let's start with creating a case.


We can populate the case with some basic information:


Once we have a case, select "New Host" on the window, and we will get to here:


Once we have a host, we can add an image file.


Once we selected the image file (no browse function, we need to type the file path), on the next screen we can chose to calculate MD5 hash for the disk image. We can also see that it was recognized as a NTFS partition.


Once we added the image and clicked on the "Analyze" button, we can do several things. On the "Image details" we get general meta information from the image itself.


On the "Data Unit" we can enter a cluster, and it will print its content, we can chose to display it in ASCII, HEX or ASCII strings.


On the "File Analysis" menu, we can browse the file system, look for files, etc... if we click on a file, it will display its content in the frame below, and again we can chose the same view options.


On the "Meta Data" menu, we can enter the MFT entry number (which we can figure out from the previous place), and display meta information from a file.


Backtrack Forensics: Xplico

Menu: Forensics -> Network Forensics
Directory: /usr/local/bin/launchxplico.sh
Official Website: http://www.xplico.org/
License: GNU GLP v2 + Creative Commons Attribution-NonCommercial-ShareAlike 3.0 Unported

Xplico is an open source network forensic tool, which can extract various data from network traffic, it can either work from a capture file or do a capture itself. It can extract images, emails, web pages, VoIP streams, chat (MSN, IRC,...), telnet, ftp data, etc... It has a command line and a graphical interface. Let's see some basic usage:

I will use the graphical version, which we can start from the Backtrack menu. We get this:


We can go to the http://localhost:9876/ address, and can login from there.
The default users are:
admin/xplico - for administration, we can't do the normal work with this account.
xplico/xplico - for normal work. 
Once we logged in, we need to open a new case. We need to decide there if we will work from files or from live captures later. Both won't work in a single case.


Once we have a case, we can click on it, and thus start work.


In the case, we need to create sessions. where we can load the pcap files, or do the captures.


Once we have a session, we can enter to it.


Once we enter to a session, we can upload file at the right bottom corner, or if we have a live capture case, then start the capture there. On the left side we have the navigation bar, where we can select the various extracted information, and browse within them. At the middle, we have an overview, about how much items we have in each various data type.


Here is an example of images:


Here is a picture of the web URls found in the session.


That's all in short. I run a few captures, and the tool doesn't really find all of the images in a session. It might work better with other items.

Backtrack Forensics: tcpreplay suite

Menu: Forensics -> Network Forensics
Directory: /pentest/sniffers/tcpreplay
Official Website: http://tcpreplay.synfin.net/
License: GNU GLP v3

From the website: "Tcpreplay is a suite of tools written by  Aaron Turner for UNIX (and Win32 under Cygwin) operating systems which gives you the ability to use previously captured traffic in libpcap format to test a variety of network devices. It allows you to classify traffic as client or server, rewrite Layer 2, 3 and 4 headers and finally replay the traffic back onto the network and through other devices such as switches, routers, firewalls, NIDS and IPS's. Tcpreplay supports both single and dual NIC modes for testing both sniffing and inline devices."

The suite consists of the following tools:
tcpbridge - bridge two networks with tcprewrite
tcpprep - tool to use preprocess pcap files, and will create cache files, which will be used by tcpreplay or tcprewrite. It will classify packets as client -> server or server -> client.
tcprewrite - pcap editor to rewrite layer 2, 3 or 4 details
tcpreplay - replays packets to network
tcpreplay-edit - replays and edits pcap files to the network

not found in Backtract 5 R3:
"tcpliveplay - Replays network traffic stored in a pcap file on live networks using new TCP connections
tcpcapinfo - raw pcap file decoder and debugger"

Basically we can capture a traffic between a client and server, and replay it anywhere in the network. For actually testing a network, we will need to run tcpreplay in two locations, in the server and in the client side, where the client side will replay packets of the original client, and the server the other part. The MAC address, IP addresses and port numbers can be changed, thus this way we can create the same flow anywhere in the network, and check how the different locations behave.

To simply replay all packets from a capture:
./tcpreplay --intf1=eth0 test.pcap


A good article about testing Cisco WAAS with tcpreplay:

Backtrack Forensics: tcpflow

Menu: Forensics -> Network Forensics
Directory: /usr/local/bin/tcpflow
Official Website: https://github.com/simsong/tcpflow
License: GNU GLP v2+

"tcpflow is a program that captures data transmitted as part of TCP connections (flows), and stores the data in a way that is convenient for protocol analysis and debugging. Each TCP flow is stored in its own file. Thus, the typical TCP flow will be stored in two files, one for each direction. tcpflow can also process stored 'tcpdump' packet flows."

In Backtrack 5 R3 the installed version is 1.2.7, and it has a bug, that will terminate the program as soon as it started, see details here:
https://github.com/simsong/tcpflow/issues/3

So we need to upgrade it:
apt-get install tcpflow
at the time of this writing, the new version is 1.3.0. You can check it with:
tcpflow -V

Let's see an example:
tcpflow -p -i eth0 tcp port http
Here I filter the capture to HTTP ports (80) only, and set the interface not to be in promiscuous mode (-p). I visited "www.google.com", and it created 6 flows, 3 pairs (1-1 for each direction). It supports the same filtering options as tcpdump.


The flow files actually contains the extracted data from the TCP sessions, so we won't see packet headers, etc...


We can read sessions from a pcap file (-r), specify output directory (-o) other than the default, which is the current, turn on verbose mode (-v), or print the output only to the console (-c) instead of files.
I think it does a pretty good job with extracting content from TCP flows.

The tool can't handle IP fragments, and in that case it happens the reconstruction of a flow will not be correct.

Backtrack Forensics: Wireshark

Menu: Forensics -> Network Forensics
Directory: /usr/local/bin/wireshark
Official Website: http://www.wireshark.org/
License: GNU GLP v2+

This "article" is here just to take a note of this tool as well for completeness. It's so huge, that I even don't try to write about it, you can read the manual of buy their official book, which is 1000 pages.

The tool description from the official website Q&A:
"Wireshark® is a network protocol analyzer. It lets you capture and interactively browse the traffic running on a computer network. It has a rich and powerful feature set and is world's most popular tool of its kind. It runs on most computing platforms including Windows, OS X, Linux, and UNIX. Network professionals, security experts, developers, and educators around the world use it regularly. It is freely available as open source, and is released under the GNU General Public License version 2. It is developed and maintained by a global team of protocol experts, and it is an example of a disruptive technology. Wireshark used to be known as Ethereal®."


Friday, February 1, 2013

Backtrack Forensics: File recovery with testdisk & photorec

Menu: Forensics -> Forensic Carving Tools
Directory: /pentest/forensics/testdisk
Official Website: http://www.cgsecurity.org/wiki/TestDisk
License: GNU GLP v2+

testdisk is a data recovery tool, it was primarily designed to restore damaged partition, fix deleted boot sectors and undelete files. It supports very large range of file systems. You can find the list on their webpage. For the demo I choose forensic test image #7 from  http://dftt.sourceforge.net/test7/index.html. This is an NTFS file system with a couple of deleted files, it has fragmented files, NTFS alternate datastream, so pretty good for testing. We can also have the files' MD5 hashes, so we can check how good our results are.

To start the tool, simply type:

./testdisk_static /root/Desktop/7-ntfs-undel.dd

On the first screen select the disk, and click proceed, you want to work on, in this case we have only one option. If we start it without an image name it will allow us to select from the system drives. We can always go back to the previous screen with pressing "q".


On the next step we should select the partition table. In my experience best to choose "None" as then its detection is the best. If we choose "Intel" it might not find it.


On the next screen we can do couple of things. Let's run an "Analyse" first.


This will do a quick analysis of the disk and partitions, we need to hit a couple of buttons to finish.


If we go back and choose the "Geometry" option, we can change the hard disk properties, if we now what they were, and think that the auto detection was not correct. It's good in our example.


Let's go back, and select the "Advanced" option, here we can fix boot sectors, recover files, or make an image. I will move to "Undelete" cause I want to recover the files.


Here, I simply press "a" to select all files, I want to recover all of them, to see how it works out. We can restore a single file with "c", select one with ":" and finally restore selected with "C".


When we press "C" it will offer us to select a location where to save the files. Once we found the directory press "C" to copy the files.


After that I made an MD5 cheksum to all files with:
md5deep -e -r /root/Desktop/testdisk
and if we compare the MD5s found on the webpage of the image, we can see that all of them are correct.


Next tool is photorec, which can restores files based on their signatures, similar to foremost and scalpel. Originally it was developed to restore image, that's why the name, but since then many different file types were added. I used here test image #11 from the same site. We can start it similarly to testdisk:

./photorec_static /root/Desktop/11-carve-fat.dd

Then we can choose our disk. Again if we don't specify it will offer the system drives.


After that we can choose between a few options. Let's go to "File Opt" first, where we can chose which file types we want to recover.


You can see that we have lots of options, I simply left the default selection. Press "q" to go back.


Then choose "Search", after that we need to specify the file system. I know it's FAT in this case.


Then we need to select again where to store the recovered files.


Once the search finished, it will tell us how many files were found.


We won't have the file names in this case, cause the restoration was based on file headers and not file system entries. In some cases it will add a name if it can be found in some metadata. I run an MD5 check again, and we can see that the signature is matching most of the cases. It's not perfect, but still pretty god.


There is one more tool in their directory called "fidentify", which can do file type identification, using the same database as photorec. Run it with specifying the directory:


./fidentify_static /root/Desktop/testdisk/

and as we can see it prints the file type.


Thursday, January 31, 2013

Backtrack Forensics: safecopy

Menu: Forensics -> Forensic Carving Tools
Directory: /usr/local/bin/safecopy
Official Website: http://safecopy.sourceforge.net/
License: GNU GLP v2

safecopy is a data recovery tool which tries to extract as much data as possible from a seekable but problematic (i.e., damaged sectors) source like floppy drives, hard disk partitions, CDs, etc., where other tools like dd would fail due to I/O errors. It can do multiple runs on a bad disk, first will try to extract easily accessible, error free data, and make not of the bad sectors. On the next run, it will retry the bad sectors multiple time, with better resolution. This is what their default example shows as well:

Safecopy 1.6 by CorvusCorax
Usage: safecopy [options] source target
Options:
--stage1 : Preset to rescue most of the data fast,
using no retries and avoiding bad areas.
Presets: -f 10% -r 10% -R 1 -Z 0 -L 2 -M BaDbLoCk
-o stage1.badblocks
--stage2 : Preset to rescue more data, using no retries
but searching for exact ends of bad areas.
Presets: -f 128* -r 1* -R 1 -Z 0 -L 2
-I stage1.badblocks
-o stage2.badblocks
--stage3 : Preset to rescue everything that can be rescued
using maximum retries, head realignment tricks
and low level access.
Presets: -f 1* -r 1* -R 4 -Z 1 -L 2
-I stage2.badblocks
-o stage3.badblocks
All stage presets can be overridden by individual options.

There are many more options, we can set retries (-R), create a bad block file output (-o), and use it later as an input (-I). We can also mark the bad areas with a special string (-M) instead of zeros, thus we can find those locations more easily later.

As I don't have any damaged media, I just did a simple run:
safecopy /dev/sdc sdc1.img


Backtrack Forensics: EXT3/4 file recovery with extundelete

Menu: Forensics -> Forensic Carving Tools
Directory: /usr/local/bin/extundelete
Official Website: http://extundelete.sourceforge.net/
License: GNU GLP v2

extundelete is a file recovery tool for EXT3 / EXT4 journaling file system. It can recover files by reading the journal log, and the inode tables. The drive where we are recovering files from, should be unmounted in order to work. The restored files will be placed in the "RECOVERED_FILES" directory.

Usage:

It's quite simple. I created a new virtual hard disk for the test, formatted it, and placed 3 files there. I also created an MD5 sum for all.


Then I unmounted it, and restored one file, with:

extundelete --restore-file 'a.txt' /dev/sdc1
and rechecked the MD5 hash, which is matching.


We can restore all files on a drive with:
extundelete --restore-all /dev/sdc1

We can also restore based on the inode number:
extundelete --restore-inode inode_number /dev/sdc1
The restored files, will have an extension of the inode number.