Friday, February 17, 2012

hexinject

Privilege Escalation -> Spoofing Attacks -> Network Spoofing -> hexinject

hexinject is capable to inject any packet to the network, which we construct on our own in hex. The tool doesn't do any verification, so it will send even a sentence like 'jaj de finom ez a leves' (this soup is really tasty - in Hungarian). Thus if we screw up the various protocols' structure another software won't be able to understand it. It has a sniffing mode, where we can listen to the network traffic. It's quite hard to use on its own, but using pipes or scripts it can be really useful.

Examples:

hexinject -s -i eth0 -> sniffing eth0 interface


hexinject -s -i eth0 -r -> output in raw format

hexinject -s -i eth0 -r | strings -> using strings


hexinject -s -i eth0 -r | strings | Host -> filtering on hosts 


echo 'Jaj de finom ez a leves' | hexinject -p -i eth0 -r -> sending a custom string to the network


This will create a packet like this:


The possibilities are unlimited, it's worth to read the documentation and other examples on its webpage:

Thursday, February 16, 2012

yersinia

Privilege Escalation -> Spoofing Attacks -> Network Spoofing -> yersinia

yersinia is a vulnerability testing tool for LAN protocols (cdp, dhcp, dot1q, dot1x, dtp, hsrp, isl, stp, vtp). For example, we can do:
- CDP flooding
- Trunk port creation with DTP (dynamic trunking protocol)
- VLAN creation / removal with VTP
- Creating fake Spanning Tree root device
etc...

It has 2 main modes: command line and GUI based, for using the first one, we need to dig a lot in its manual in order to do something, and the graphical interface is said to be only in beta. In reality both modes has a few bugs. Unfortunately I can't do examples, cause I don't have a switch to test with.

Starting GUI mode:

yersinia -G


We can start an attack at the "launch attack" menu, and stop in the "list attacks" menu.

Protection for the various protocols:

cdp - enable only where needed
dhcp - dhcp snooping
dot1q - configure static access ports towards the hosts
dot1x - use certificate authentication
dtp - turn it off, and use static trunk / access ports
hsrp - use authentication
isl - see dot1q
stp - use spanning tree protection features like BPDU guard, root guard, etc...
vtp - use authentication, or don't use vtp at all

Backtrack basics 12. - Connecting to WPA2 wireless network

Here is a short description, about how to connect to WPA2 protected wireless networks with Backtrack 5. First edit the wpa_supplicant.conf file, where we can set the WiFi parameters:

wpa_supplicant.conf:


ctrl_interface=/var/run/wpa_supplicant


network={
ssid="ssid_name"
psk="pre_shared_key"
key_mgmt=WPA-PSK
proto=WPA2
pairwise=CCMP
group=CCMP
}

Then run the following commands:

root@bt:/etc/wpa_supplicant# ifconfig wlan0 up


root@bt:/etc/wpa_supplicant# wpa_supplicant -B -D wext -i wlan0 -c /etc/wpa_supplicant.conf


root@bt:/etc/wpa_supplicant# dhclient wlan0

Wednesday, February 15, 2012

ettercap + example: DNS spoofing

ettercap is a tool for doing LAN based MitM attacks, which based on ARP spoofing. After it succeeded to step in the traffic flow path, we can do several things with it, for example:
- data modification
- extracting passwords
All of these are accomplished by plug ins.

In order to get ARP spoofing work properly we need to turn on IP forwarding:

echo 1 > /proc/sys/net/ipv4/ip_forward

Ettercap is already installed in the 64bit version, in the 32 bit version we need to install it:

apt-get install ettercap

We can use the tool in 3 modes: text, cursor, graphical:
ettercap -T
ettercap -C
ettercap -G

I will use the graphical.


Once started, choose the Sniff -> unified sniffing menu, and make a device discovery, which will send an ARP message to all IPs in the subnet. We can load the devices from a file.


Then add the two devices, which you want to sniff to the target list. I used the default gateway and my laptops IP here.


Then load the plugin you want to use.


With choosing MiTM -> Arp spoofingot we can perform the attack, and now we are in the traffic's path between the two machines. At the Start -> Start sniffing menu we can actually activate the attack. For the DNS spoofing we can set the fake domain - IP pairs in the following config file:

/usr/share/ettercap/ether.dns

If all goes well, we can redirect the computer's traffic to a custom target:

The ettercap log:


Stopping can be done in the Mitm -> Stop mitm attack menu.

Protection:

1. Basically we need to protect against ARP spoofing, which is the same what I described at the arpspoof tool.
2. Don't use DNS - this can be realistic in some cases
3. Use IDS / IPS on the LAN - this is not so common, and not too effective against such attacks like this
4. Use DNSSEC - DNS signed with a certificate, this one also not widely used

Tuesday, February 14, 2012

IPv6 pentesting 7. - trace6

trace6 is a traceroute utility for IPv6. It can do TCP and ICMPv6 based trace, and we can also set the source address.

Basic usage:

trace6 interface destination-ip [port]

If we set the port number it will do a TCP trace, otherwise an ICMPv6.

Example:

trace6 eth0 3003::1 80

Monday, February 13, 2012

arpspoof

We can start the tool simple from the terminal. I don't want to go into the details how arpspoof works, there are tons of writing about that on the Internet. In short, we can become a man in the middle between two hosts on a LAN, with overwriting their ARP table with a false entry, which points to us, instead of the real address - this can be done with ARP.

Before we start it, we need to tun on IP forwarfing on Linux:

root@bt:~# echo 1 > /proc/sys/net/ipv4/ip_forward

Usage:

arpspoof [-i interface] [-t target] host
where
target - the hosts, whos traffic we want to sniff
host - The host we want to personate

Thus we need to run this from two windows, because running it for a single host we will see only one part of the traffic. We need to personate two hosts.

Example:

root@bt:~# arpspoof -i eth1 -t 192.168.1.2 192.168.1.18
root@bt:~# arpspoof -i eth1 -t 192.168.1.18 192.168.1.2


after that we can see the traffic in Wireshark:


The tool is part of the dsniff package, which is available here:


Protection:

Most modern switches already have a service, which tracks what MAC address is used on a port, and it allows only valid ARP traffic, which means that only those ARP packets will be allowed, which contains the MAC address of the host on that port. Cisco and Juniper calls it "Dynamic Arp Inspection (DAI)". More information:

Sunday, February 12, 2012

httprint

Information Gathering -> Network Analysis -> Service fingerprinting -> httprint

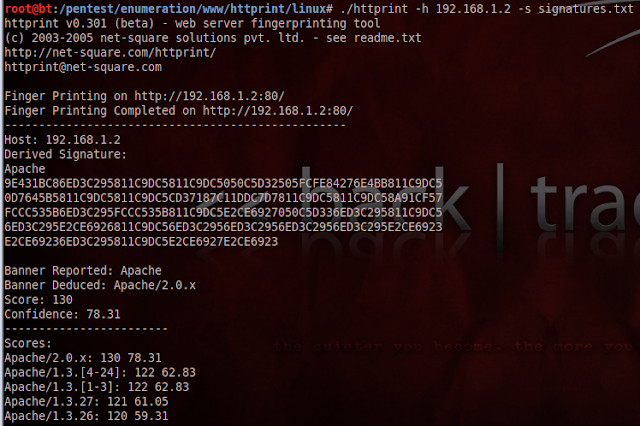
This tool can also identify webservers with cheking fingerprints. It compares the gathered data with its fingerprint database, and assigns a probability to the server type, and it lists them in descending order. The app has a GUI version as well.

Usage of the command line version:
Folder:
/pentest/enumeration/www/httprint/linux#

Examples:
./httprint -h 192.168.1.2 -s signatures.txt
./httprint -h 192.168.1.2 -P0 -s signatures.txt <- turn off ping
./httprint -h 192.168.1.2 -P0 -s signatures.txt -o results.html <- print the output to file


Official website: http://net-square.com/httprint/

IPv6 pentesting 6. - thcping6

With thcping6 we can carft a custom ICMPv6 packet, with being able to configure almost any field in the header, at least the most important ones.

I just did a simple example, without digging into too much:

thcping6 interface source-ipv6 destination-ipv6

IPv6 pentesting 5. - fake_router6

The fake_router6 tool sends RA (router advertisement) packets to the network with highest priority, thus claiming itself a router. It can achieve two things this way:
1. Set the machine as the default gateway, potentially allowing us to be MitM
2. If we give a non-existent link-local address, then it will be a DoS attack, as hosts will send the packets to a black hole
3. If we don't forward anything, only receive the packets as a DG, that is also a DoS

Simple usage:

fake_router6 interface address-prefix/prefix-length

eg.:

fake_router6 eth0 3003::1/64


After we start to advertise ourselves, the host receive it, and generates an address for itself:

IPv6 pentesting 4. - dos-new-ip6

This tool can be considered as a pair of detect-new-ip6. Similarly it listens for ICMPv6 DAD packets on the network, but if it sees one, it will send a response that this IPv6 address already exists, this way we can reach, that no host will be able to connect to the network - DoS attack.

If you are using BT5 64bit version, as myself, it won't work properly, along with detect-new-ipv6. I managed to get it work only if I started Wireshark, and a capture with it. Unfortunately also Wireshark didn't start properly:

wireshark: error while loading shared libraries: libwsutil.so.0: cannot open shared object file: No such file or director

The solution is:
1. Reinstall Wireshark
2. Copy files:

cp /usr/local/lib/libwsutil.so.1 /usr/lib/libwsutil.so.0
cp /usr/local/lib/libwiretap.so.1 /usr/lib/libwiretap.so.0

After that it works properly.

Usage of the tool is similar:

dos-new-ip6 interface
eg.:

dos-new-ip6 eth0


Part of the related Wireshark output:


And finaly the message on Windows 7, a successful DoS attack:


Update: On BT5 32bit version you also need to run Wireshark in order to get it worked. I suppose it starts a module or process, which the tool doesn't.


Saturday, February 11, 2012

httsquash

Information Gathering -> Network Analysis -> Service fingerprinting -> httsquash

Httsquash is a http scanner, banner grabber and data retriever. It can scan large IP ranges for webservers. It supports IPv6, various HTTP requests and fingerprints based on httrecon signatures.

Official website: http://complemento.sourceforge.net/

Usage:

./httsquash -r [IP address range]

Example:

./httsquash -r 192.168.1.1

Friday, February 10, 2012

IPv6 pentesting 3. - alive6

The second tool from the package is alive6. This is actually scnas the network for active IPv6 addresses. It uses multiple packets for scnanning:
- ICMPv6
- IPv6 packet w/ unknown header
- IPv6 packet w/ unknown hop-by-hop options
(etc.)
we can set this with the "-s" option.
We can select from many options but the basic run is quite simple:
alive6 [interface]

Thursday, February 9, 2012

IPv6 pentesting 2. - detect-new-ip6

The tools found in thc-ipv6 package are located at the /usr/local/bin/ directory on BackTrack 5. The complete program listing and the package itself is available for download from here: http://thc.org/thc-ipv6/

The first tool I check is the "detect-new-ip6" tool. This is essentially detects the new hosts, which are connected to the network and continuously prints them to the screen. This is based on IPv6's DAD (Duplicate Address Detection) function. Each IPv6 host, when it connects to the network sends an ICMPv6 packet to a multicast address associated with its IPv6 address, and waits for a reply, with this verifying whether this address is already used by another device on the network or not. These messages are watched by the tool. The usage is very simple:

detect-new-ip6 eth0


IPv6 pentesting 1. - ping6

I'm starting a series about IPv6, since not much published about it. This is understandable, because it is still not as common, but it will not always be the case. I won't describe the IPv6 protocol, everyone can look after that.

There are not a lot IPv6 testing tools, the most widely used is the thc-ipv6 package, which contains a lot of different utilities. The goal is to go through them one by one. But before proceeding, let's look at how to ping IPv6, because the ping command does not work. What we need is a "ping6". Use it the same way as ping.

ping6 [ipv6 cím]