Directory: various
Official Website: http://www.sleuthkit.org/
License: GNU GLP v2, and various, check website for more details
The Sleuth Kit is a collection of tools, which are created for analyzing disk images and file system data, the functionality can be extended with plugins. Autopsy is the graphical front end to the Sleuth Kit. As the set contains quite much tools, I will go over only some of the basics, and then have a look on Autopsy.
mmls can give us partition information (size, where it starts, end) and cluster size info.mmls /dev/sdc

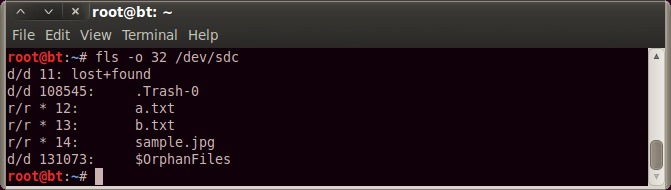
fls -o 32 /dev/sdc - will list only the root directory, -o sets the offset to the file system, which we know from the mmls output
fls -pr -o 32 /dev/sdc - prints full path, and all files recursivelyfls -lpr -o 32 /dev/sdc - prints long information (time, etc...)

icat can print the contents of a file, we need to supply the inode number for that, what we know from fls.
icat -o 32 /dev/sdc 108546
Autopsy:
I will use the following test image for the demo: http://dftt.sourceforge.net/test7/index.html
First we need to select setup autopsy from the menu, to go through a few settings. After that we can start it from "/pentest/forensics/autopsy" with:
./autopsy
First we will get the following error:
conf.pl did not return a true value at /pentest/forensics/autopsy/lib//Main.pm line 62.
Compilation failed in require at ./autopsy line 56.
BEGIN failed--compilation aborted at ./autopsy line 56.
This can be fixed by entering setting "$LOCKDIR = '/tmp'" in the conf.pl file. After that it will start, and we can navigate in the browser to:
http://localhost:9999/autopsy
Autopsy works with the following structure:
Cases -> Hosts -> Images
So let's start with creating a case.

We can populate the case with some basic information:

Once we have a case, select "New Host" on the window, and we will get to here:

Once we have a host, we can add an image file.

Once we selected the image file (no browse function, we need to type the file path), on the next screen we can chose to calculate MD5 hash for the disk image. We can also see that it was recognized as a NTFS partition.

Once we added the image and clicked on the "Analyze" button, we can do several things. On the "Image details" we get general meta information from the image itself.

On the "Data Unit" we can enter a cluster, and it will print its content, we can chose to display it in ASCII, HEX or ASCII strings.

On the "File Analysis" menu, we can browse the file system, look for files, etc... if we click on a file, it will display its content in the frame below, and again we can chose the same view options.

On the "Meta Data" menu, we can enter the MFT entry number (which we can figure out from the previous place), and display meta information from a file.

No comments:
Post a Comment